
THE PROJECT EDITOR
Introduction
The Project Editor is the main workspace of Sound to Vision, where a project is assembled from start to finish. Media is imported and arranged on a timeline, its properties are set and animated over time, and the whole composition is played back live or rendered out as a video.
Work in the Project Editor centres on assets: videos, photos, text, primitives, stacks and reactive elements, each placed on the timeline in terms of both layer and time. An asset's position, size, rotation and opacity can be set directly, animated with keyframes, or driven by an incoming signal, whether that is audio from a track or microphone, MIDI from a connected device, or a programmed signal such as a sine wave. Filters can be applied on top of any asset to alter its appearance, and these too can be driven by the same signals.
Where the Reactive Editor is used to build individual dynamic elements from scratch, the Project Editor is where those elements, and everything else, are brought together into a finished piece. Projects can be performed live, with the stage shown full screen or on a second display, or rendered to a video file for distribution.
This page describes the main areas of the Project Editor and how each is used. Use the menu on the right to navigate the sections.
Interface Overview
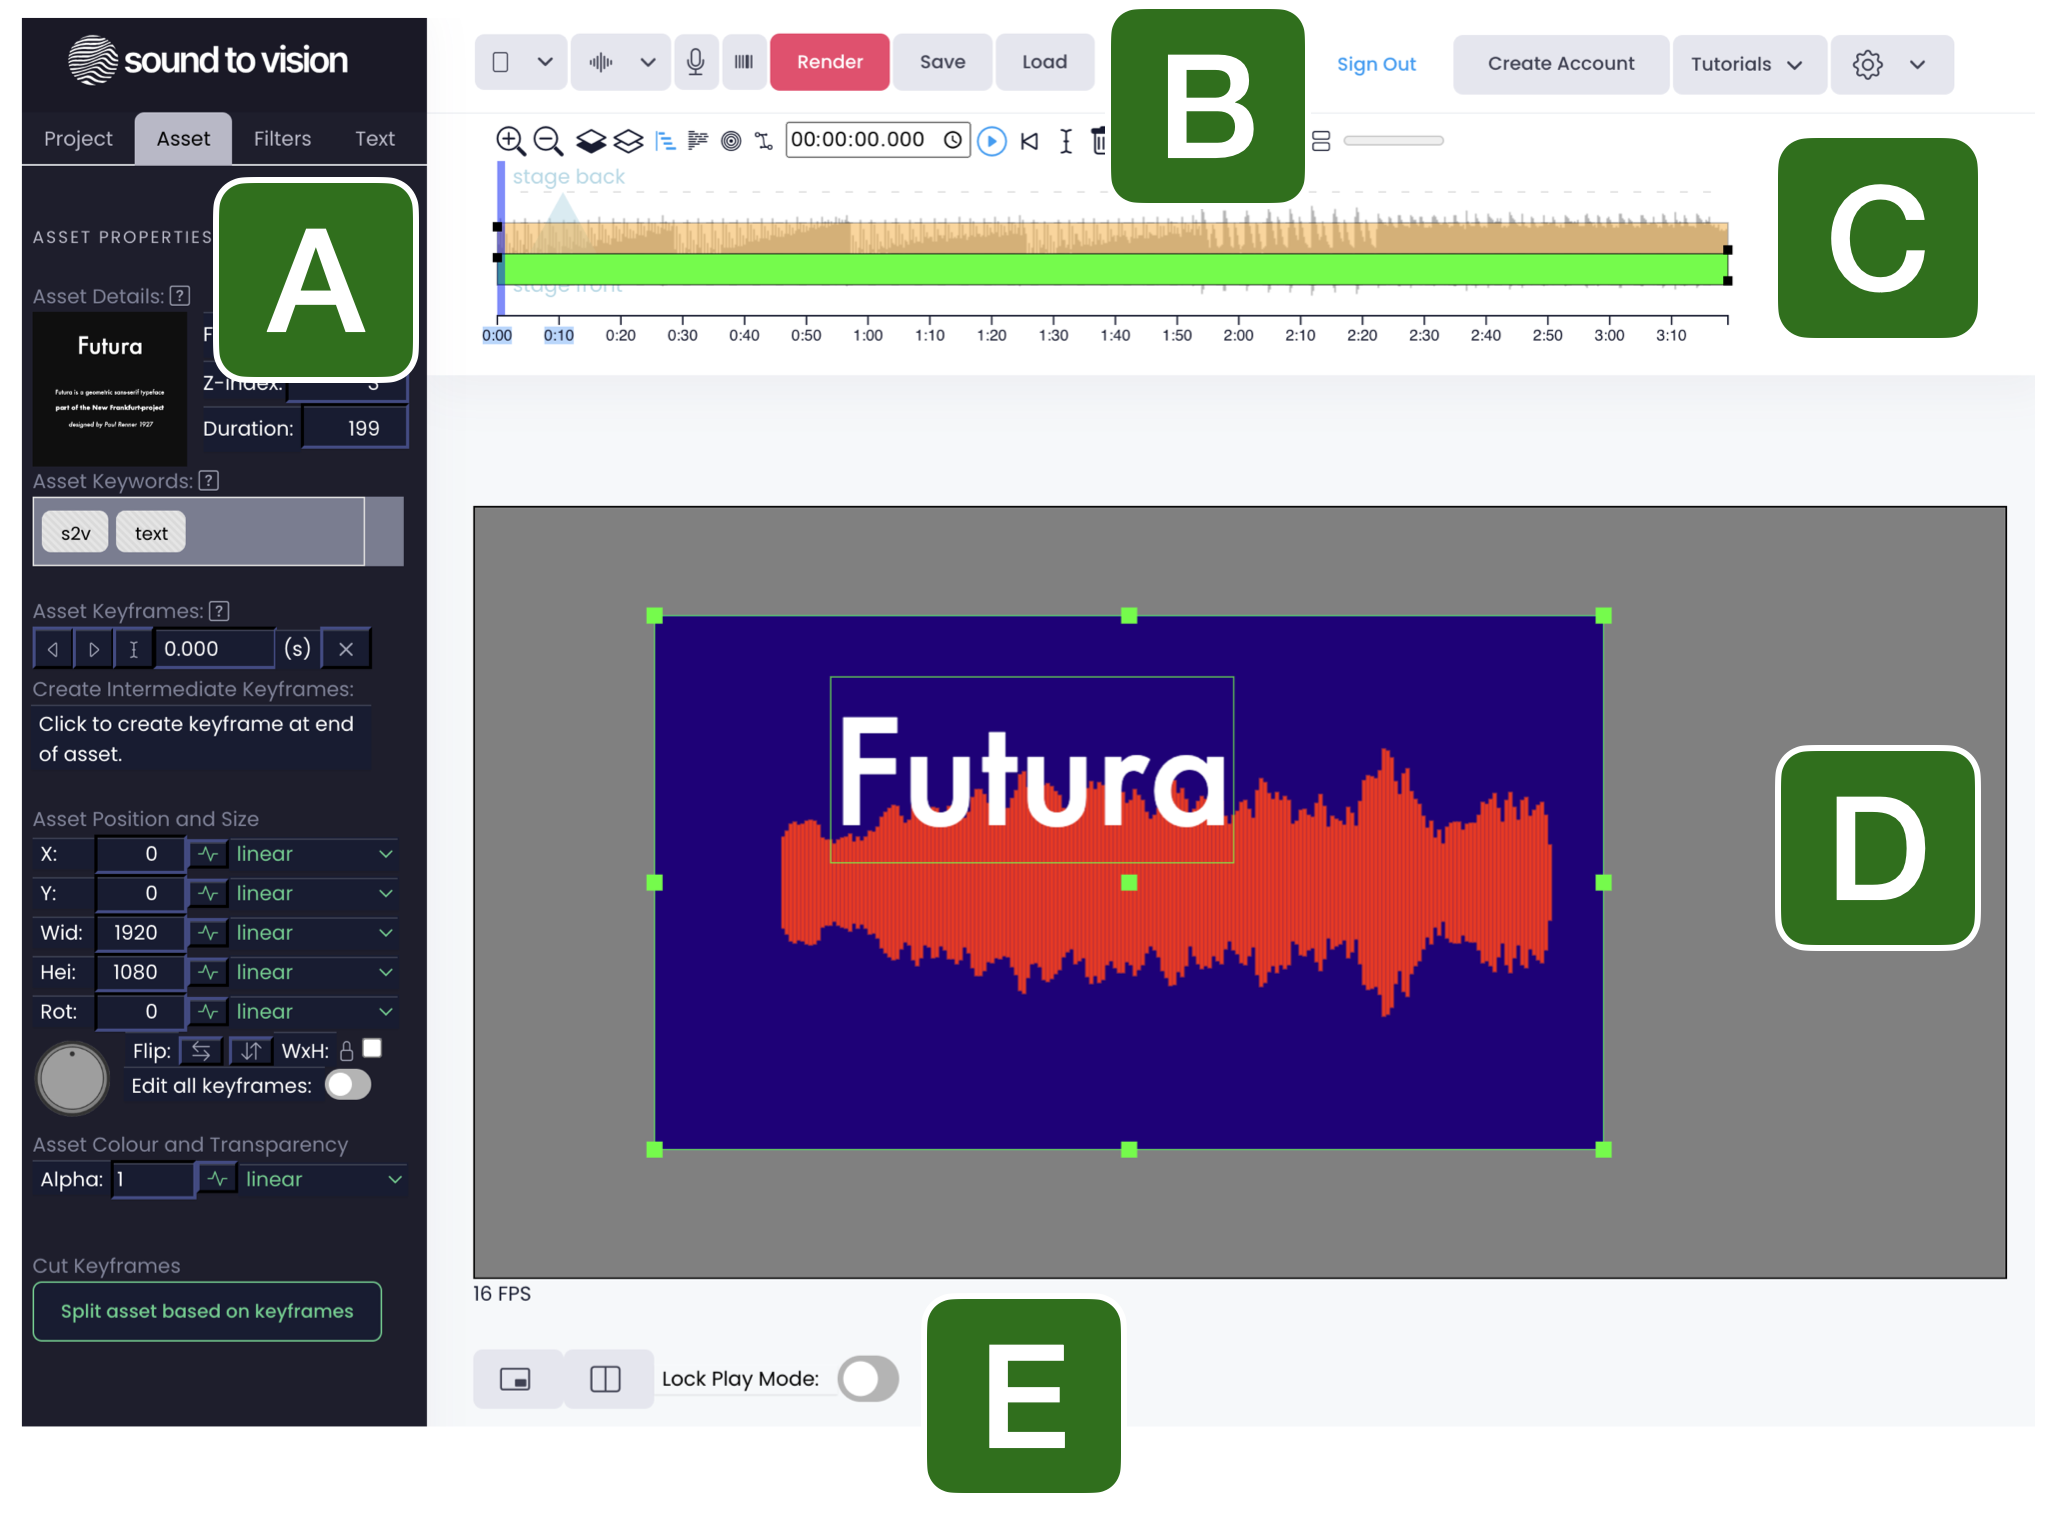
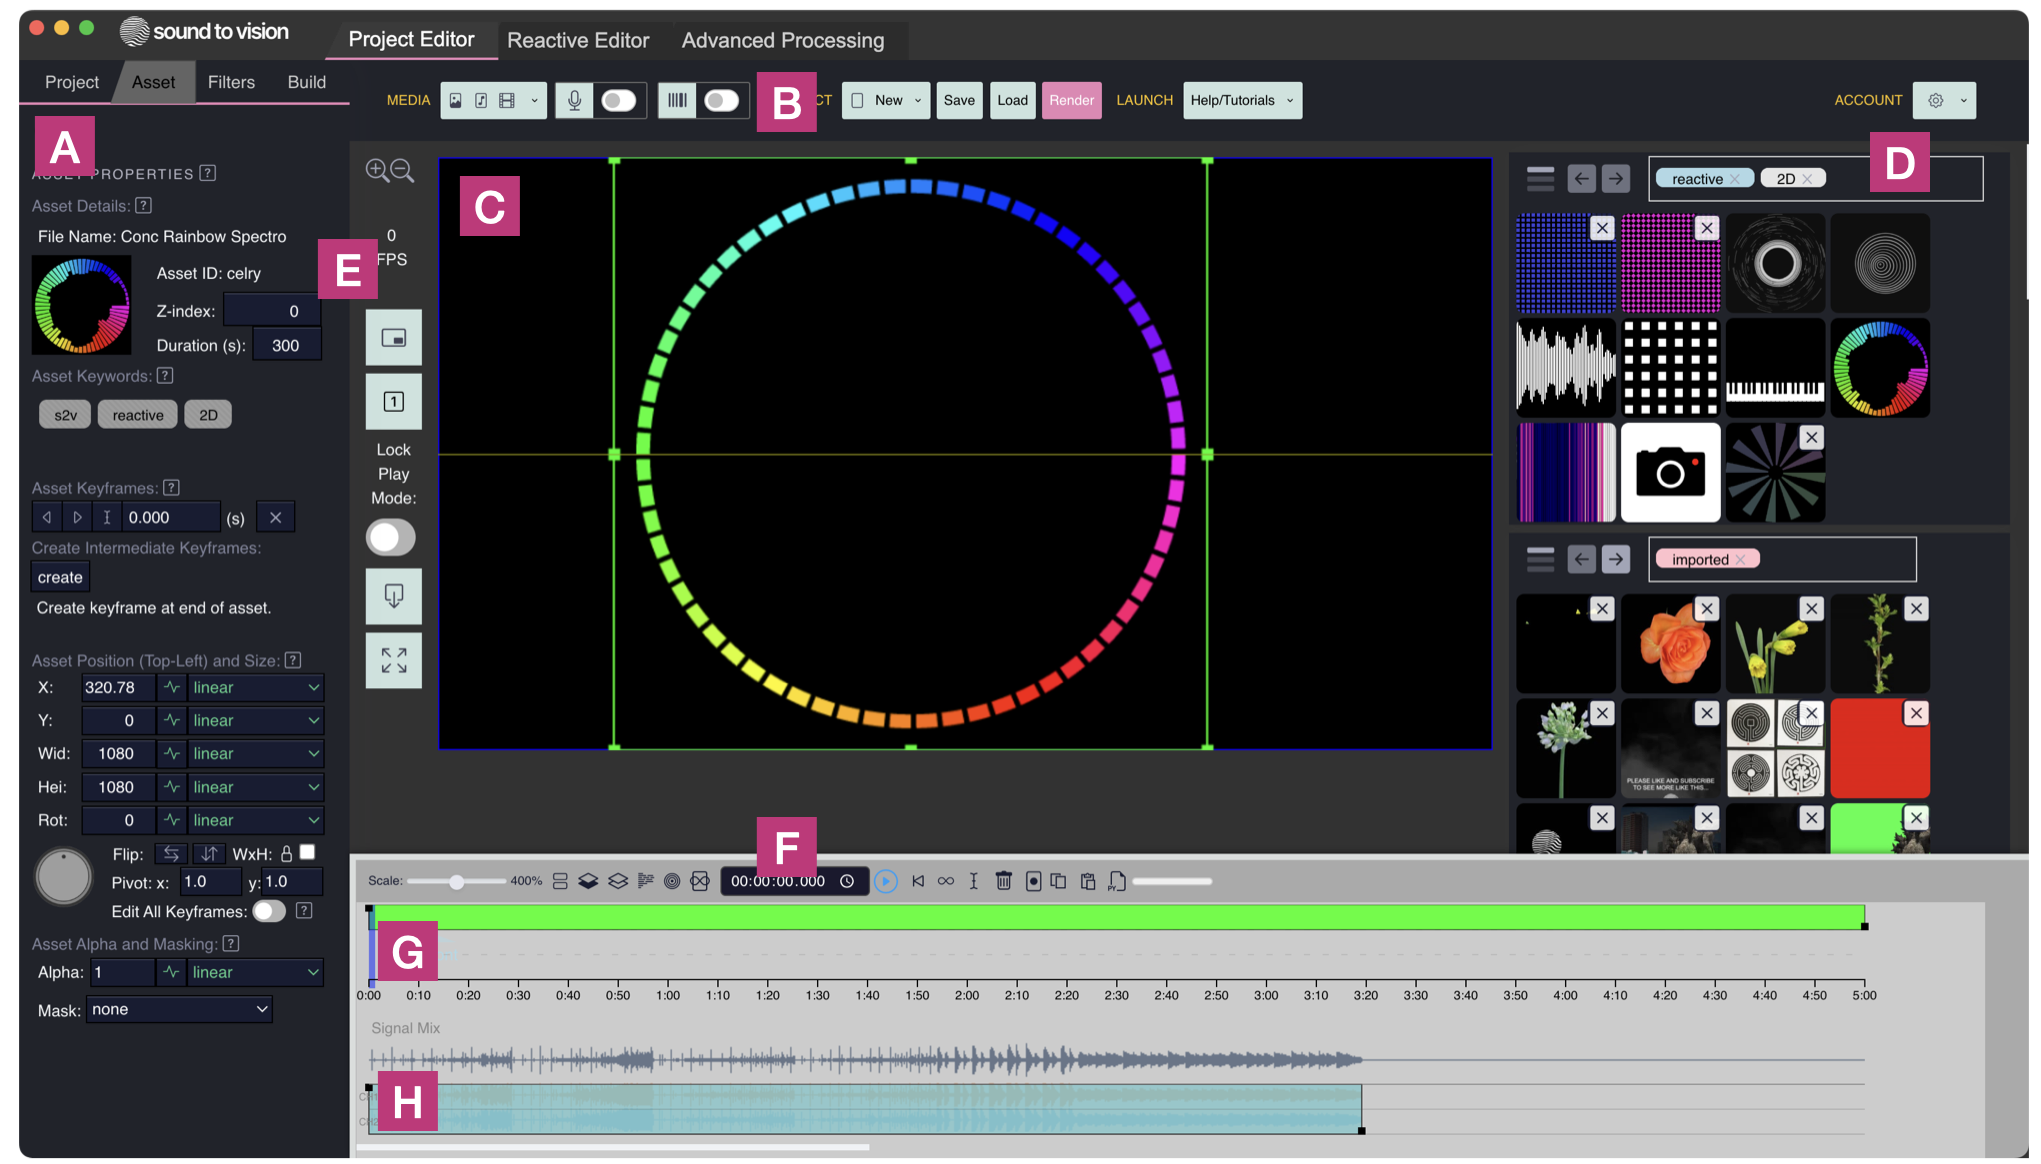
SToV Pro's interface follows the same layout as the browser version, with the addition of an upper tab-system for direct access to the different views available (Project Editor, Reactive Editor and Advanced Procssing).
The Sound to Vision (SToV) interface has been designed to allow as much intuitive control over the different tools and asset types that SToV has to offer. The Properties view (Fig. 1A) allows the properties of the different assets and the project as a whole to be modified. The SToV Menus (Fig. 1B) allow users to import media (images, video, audio), activate the microphone or MIDI sources. Furthermore, the user can render our videos of their creations, save and load projects, sign in to their online accounts, and also control their account settings. The Timeline (Fig. 1F, 1G, and 1H) is the interface area where users can control the temporal position of their assets, as well as view and manipulated audio signals relating to the sound inputs. The Stage (Fig. 1C) is where assets can be positioned and viewed in respect to one another in interactive mode, or for viewing the project when being played live. Finally, the Preview Controls (Fig. 1E) are buttons which control how the project is visualised when played or stopped, e.g. in interactive mode or play mode or full-screen or remote desktop mode.
The Properties Panel
The Properties Panel contains multiple tabs which allow the properties of the project and the assets to be modified. In addition, filters can be applied to assets in the 'Filters' tab and the different attributes of each filter controlled there.
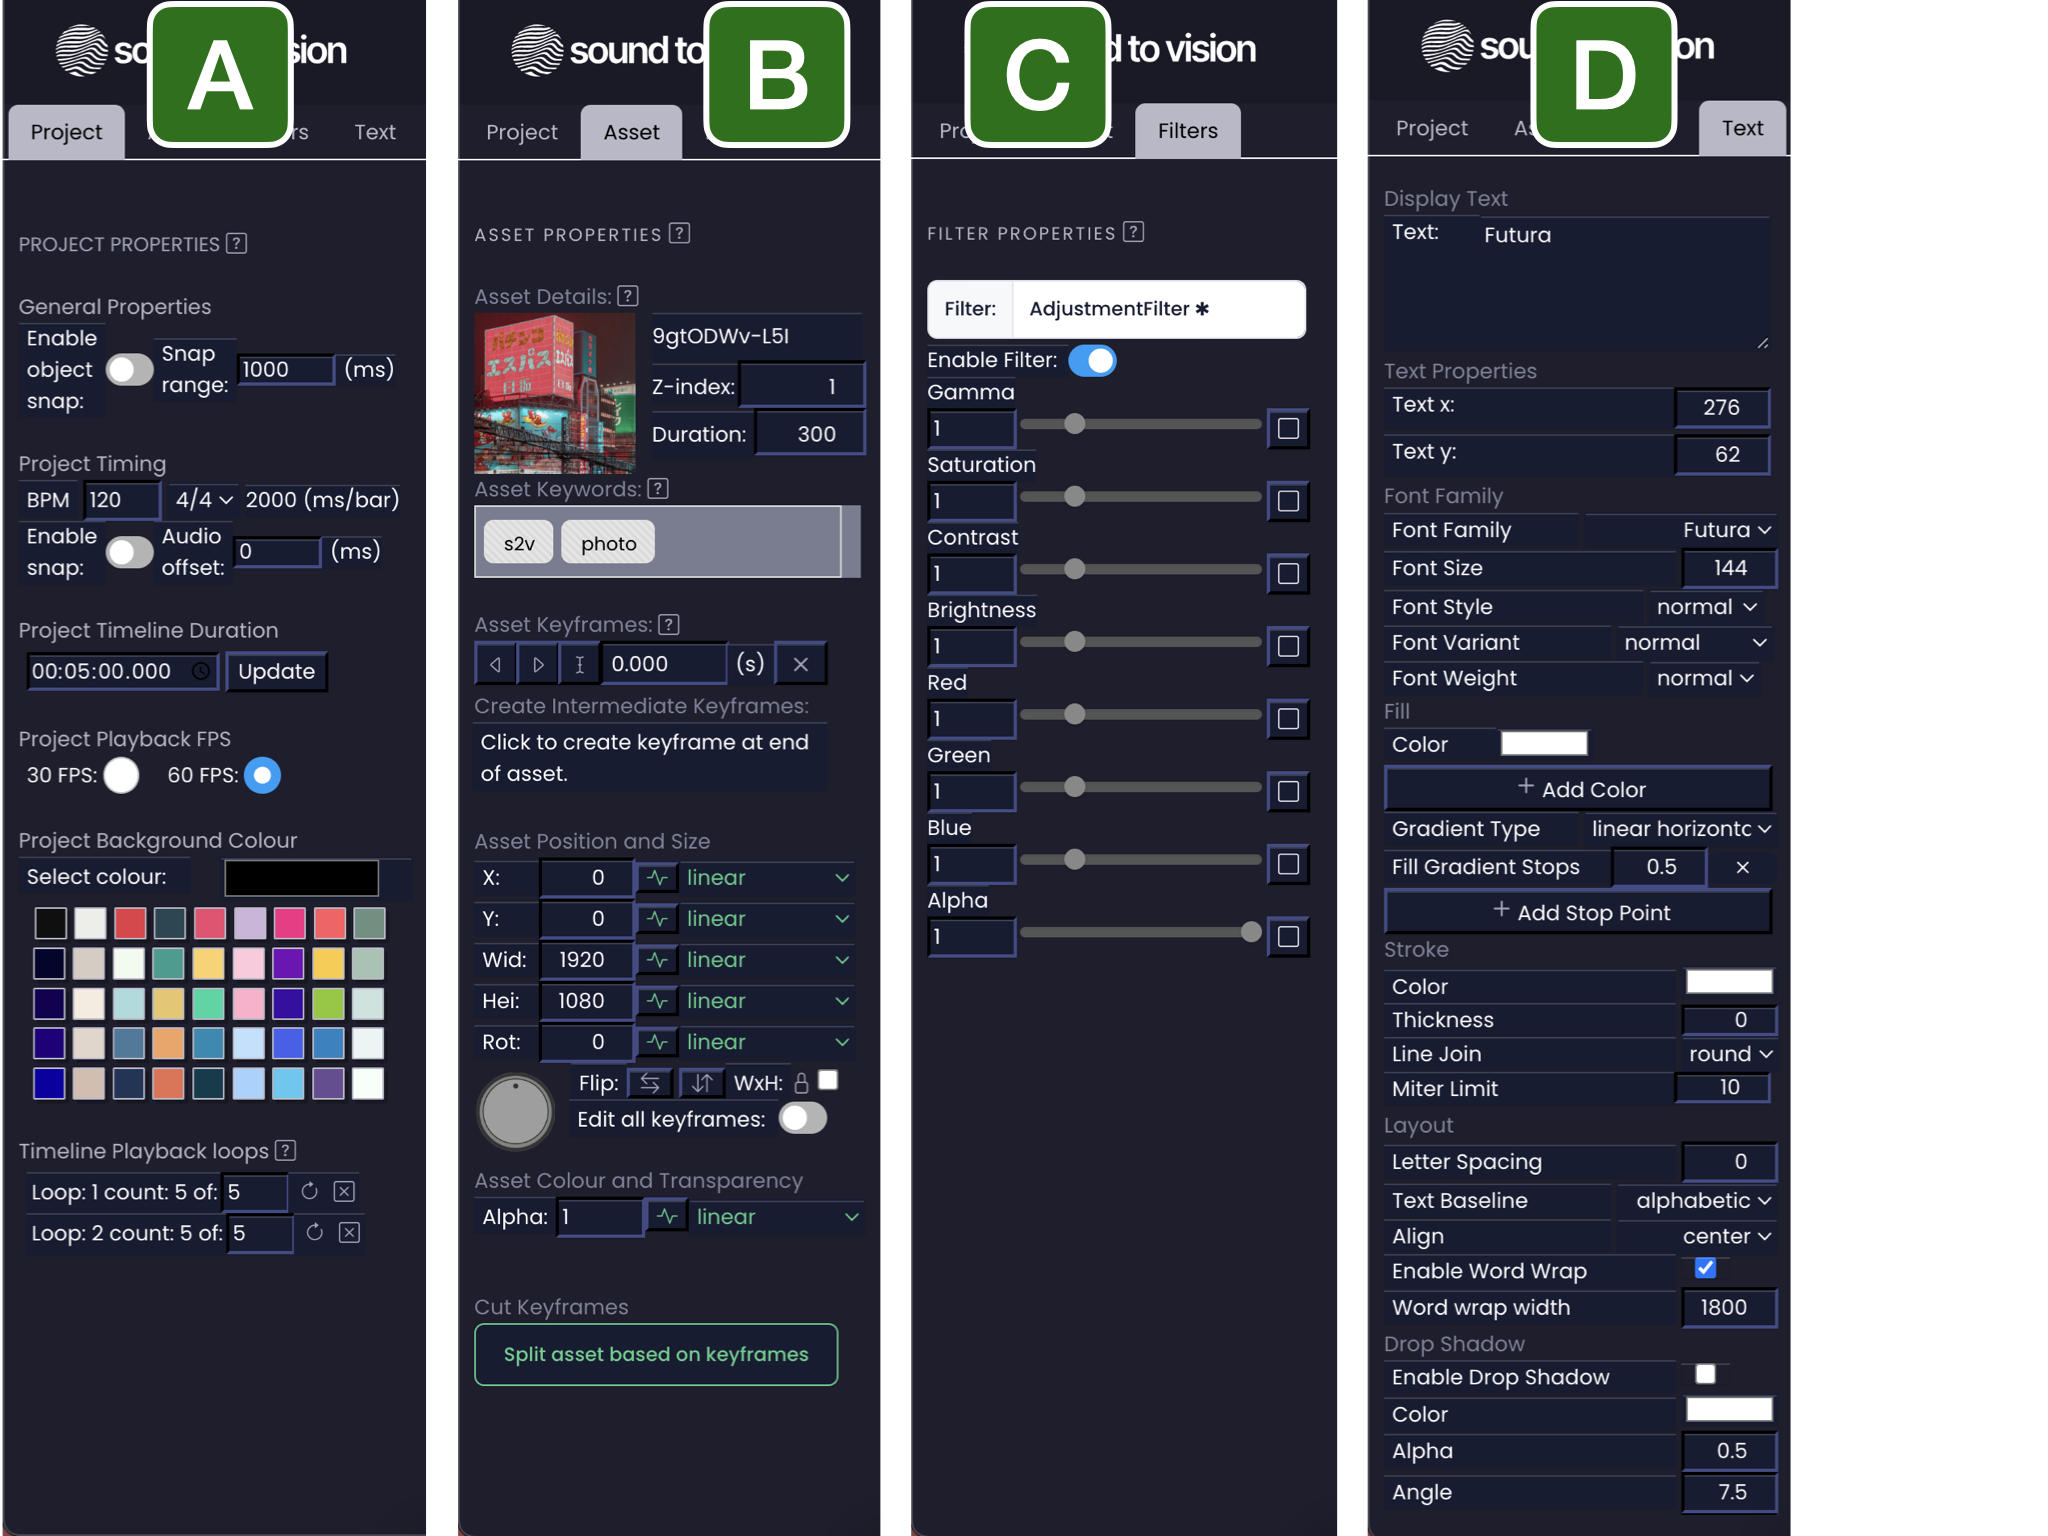
Depending on the asset type a fourth tab may also be available. For text assets there are the "Text Properties" (Fig. 2D) which allow extensive stylisation to be applied to text assets. For primitive assets there are the "Build Properties" (Fig. 2E) which provide the ability to draw and stylize simple shapes and geometries. Reactive assets also share the "Build Properties" pane however it is only possible once an asset has been modified in the "Reactive Editor" to reexport to the "Reactive Editor" rather than being able to modify the shape properties directly in the renderer.
Project Properties Tab
The Project Properties tab controls the properties of the project as a whole, as well as some timeline settings. The panel zoom controls (A) resize the panel and its buttons, making it easier to work at different screen resolutions. The Project Background Colour (B) allows the background colour to be chosen precisely, or picked from an easy-to-use palette. The Project Timing controls (C) impose musical properties on the project, making it easy to enforce a particular timing regime. The Project Duration setting (D) controls the length of the overall project and Timeline.
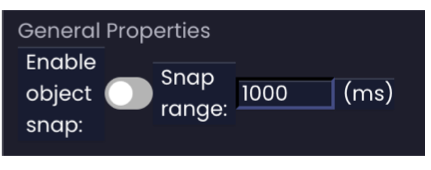
The Project Playback FPS settings (E) adjust the playback rate of the live view, which is useful when a project is complicated and smooth playback is needed. SToV Pro also offers a 120 FPS option, which is impactful on high-performance displays. Finally, the Timeline Snap Settings (F) can be used to snap objects to one another, and video snap can be applied so that videos snap to their own duration, encouraging an asset's length to match either its full duration or a whole number of loops.
Each of these 6 areas is described in more detail below.
Project Background Colour Pane
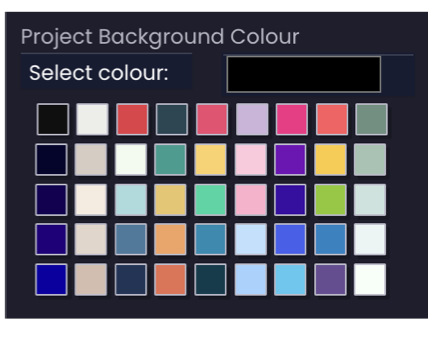
The Project Background Color can be used to specify the background colour of the stage. Many assets have transparencies incorporated into them and so the choice of background colour can be a useful touch when defining the presentation of a project. It is possible to select a specific colour by clicking the larger swatch in the the top-right corner, or by selecting one of the pre-defined palette choices below it.
Project Timing Pane
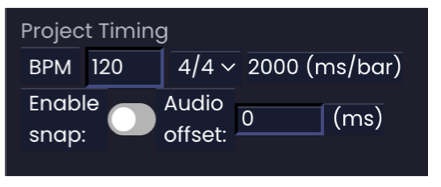
The Project Timing options impose time signature properties onto the Timeline, and is very useful for synchronizing assets with imported music. When setup, this allows the user to snap assets to beats and bars timings as defined, enabling intuitive sychronization. For this, the 'BPM' (Beats Per Minute) and the time signature (e.g. 3/4, 4/4, 5/4) can be changed resulting in an updated 'ms/bar' property. If using MIDI it is possible to read the timing of incoming MIDI timing pulses and set the project BPM here by using the 'Auto' button. This BPM can be previewed in the MIDI setup box. To engage this snapping behaviour the 'Enable Beat Snap' must be toggled to 'on' (blue). The 'Bar View' when toggled will make the timeline x-axis show bars rather than the default time (s), which is useful when arranging compositions by bar rather than explicitly time. With some audio files, the music will start playing, and the timing begin after a brief pause at the beginning. To correct for this, the 'Audio offset' property can be changed and used to introduce a delay before the timing kicks in, and so allowing perfect synchronization with beats and bars of music without having to extensively edit audio files.
Project Timeline Duration
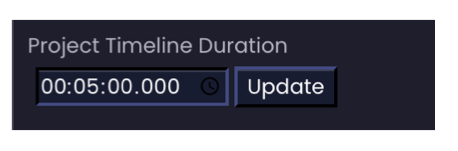
The Project Timeline Duration option allows the overall duration of the timeline to be changed. You maybe warned about the cropping or removal of assets if they are positioned within the limits of the new duration and this may result in their removal/cropping if you commit to the change. Furthermore when importing tracks you maybe asked whehter you want to crop to the duration of music being imported. Duration can be set here manually in hh:mm:ss:ms (hours, minutes, seconds and milliseconds) and then by clicking the 'Update' button.
Project Playback FPS
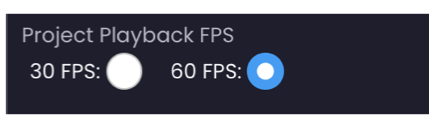
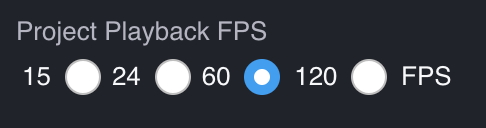
The Project Playback FPS (Frame-rate Per Second) controls the speed of playback when playing projects live. If performance is not running smoothly, it maybe beneficial to cap the frame-rate to 30 FPS, rather than the default 60 FPS. Choppy playback may result from e.g. an under-powered computer or from overheating of the CPU. Please check the FAQ section for more details.
SToV Pro also has a 120 FPS option which accelerates the rendering pipeline to display frames as 120 FPS on systems and displays that support this playback rate.
Timeline Snap Settings.
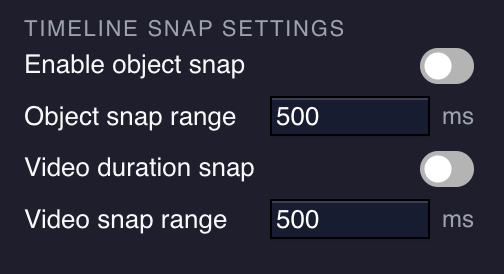
Timeline Snap Settings control the snapping of assets on the timeline. By clicking 'Enable Object Snap' you enable the behaviour that assets on the timeline will snap to one another, at either end. This makes it very easy to synchronize different assets to begin at the same time, or to synchronize a transition. The 'Object Snap Range' input sets the tolerance for this snapping property in ms. The larger this value the further away objects can be when they snap into place. The 'Video Duration Snap' only affects video assets and it is used to make it possible to snap to the inherited video duration. Videos can be cropped and easily looped by dragging the asset on the timeline. It can be advantageous however to crop the video to exactly its duration to prevent content being cropped or looping when it is not needed. This is possible using the 'Video Duration Snap' button and the tolerance of the snap can be changed using the 'Video Snap Range' input.
Asset Properties Tab
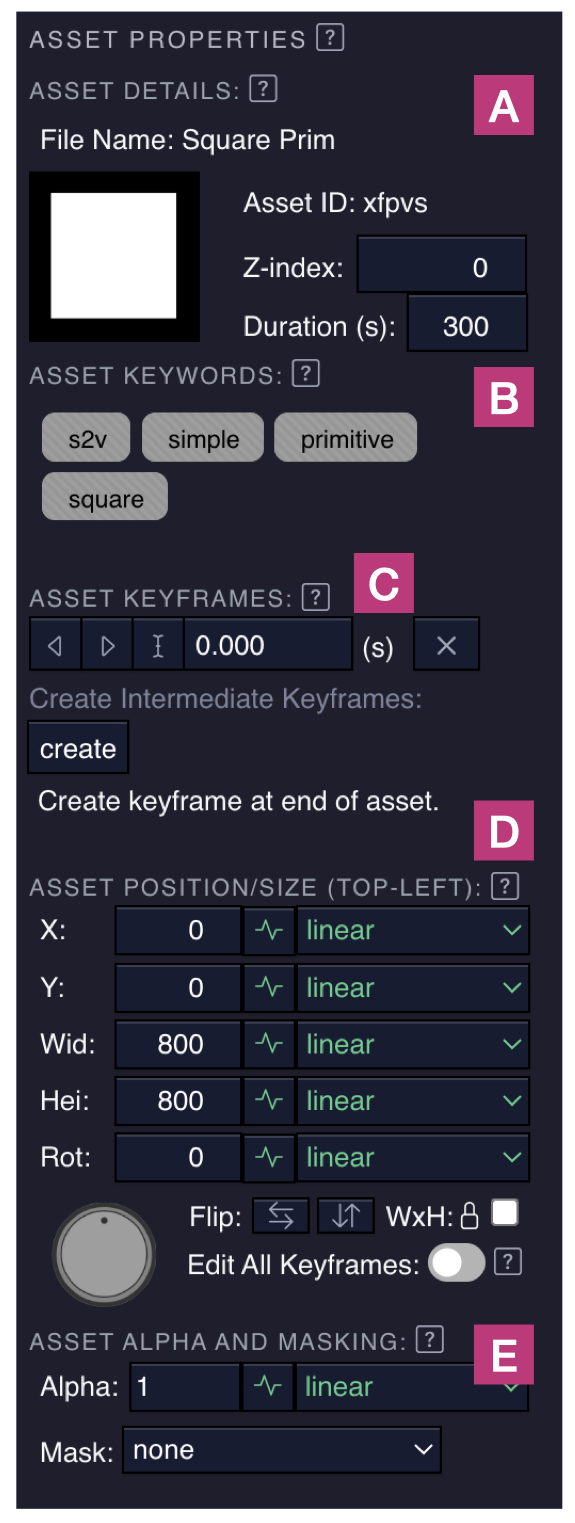
The Asset Properties Tab is the core area through which an asset's placement and spatial properties can be modified through time. It is divided into five panes. The Asset Details pane (A) displays the general details of the asset, while the Asset Keywords pane (B) stores the keywords used to describe it, which can also be edited in the Pro version. The Asset Keyframes pane (C) is used to create and manipulate the keyframes belonging to a particular asset.
The Asset Position and Size pane (D) is where an asset's spatial properties on the stage are controlled, either by setting static values or by connecting the property to an input signal, driven by an audio source, MIDI, or an algorithmic source. Finally, the Alpha and Masking pane (E) controls the alpha (opacity) of an asset, and allows a mask to be applied to modify its appearance.
Each of these five panes is described in more detail below.
Asset Details
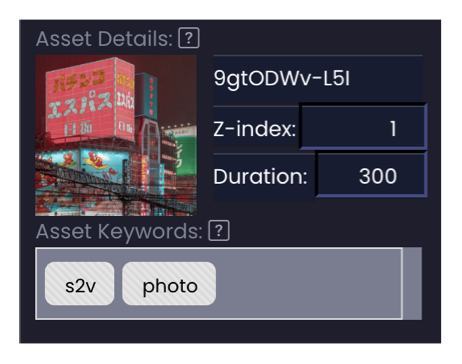
The Asset details section contains general details for the asset. E.g. the Name of the asset, The Z-index, the duration and any keywords associated with the asset. The 'Z-index' represents the order in which assets appear on the stage. A higher Z-index will result in an asset appearing in front of assets with a lower index. When assets are dragged around the Timeline the Z-index will be automatically updated and show here. It is also possible to update the index manually here, and this setting will override the value derived from the asset's position on the stage. This is designed to allow efficient ordering of assets, even when there are many assets being used.
Asset Keywords
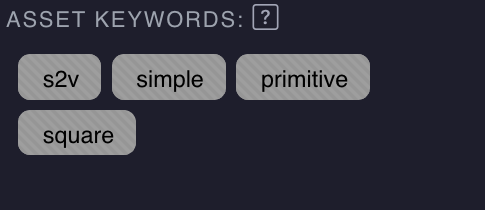
The Asset Keywords section allows you to view and edit (Pro only) the keywords associated with an asset which can be used to extend and enhance the ability to filter and refine collections of assets.
Asset Keyframes
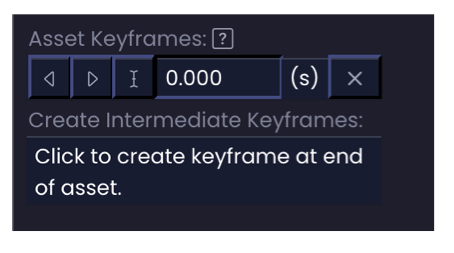
Keyframes are a fundamental concept in animation, used to define specific points in time where a change in an object's properties occurs. These properties can include position, rotation, scale, and alpha (opacity). Keyframes serve as markers that indicate the start and end of an animation sequence or the points where significant changes in the animation happen. Conventionally, artists would draw keyframes by hand, and then additional frames (in-between frames) would be created to smooth out the motion between keyframes. This process, known as "tweening," helps create fluid and realistic animations. In the context of digital animation and SToV, keyframes are used to streamline animations which are applied to assets using the timeline and properties view.
By default, SToV automatically sets a keyframe at the start of every asset. To add more keyframes, a user can use the 'Add keyframe' button in the Timeline Controls or through using the options in the 'Asset Keyframes' section shown above. If only one keyframe is present, the dialog will ask if you want to create a keyframe at the end of the asset. If more than two keyframes are present the dialog will ask how many keyframes you want to insert between the selected keyframe and the next keyframe. It is possible to adjust the timing and spacing of keyframes on a timeline using the time input and specifying the time in seconds. Adding additional keyframes will refine and enhance the animation by introducing more changes to the object's properties. It is possible to navigate between the created keyframes using the arrow buttons, and also to reposition the playpoint of the timeline (and updating the stage) on the selected keyframe, using the 'cursor' icon button.
Asset Position And Size
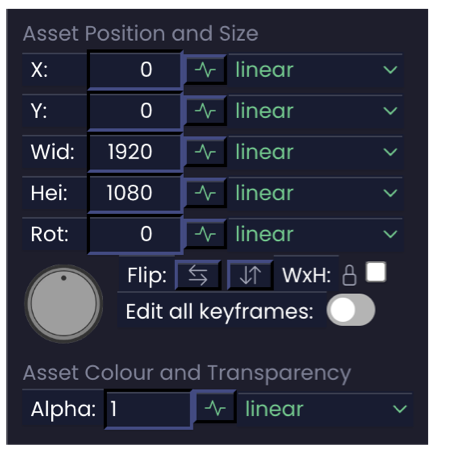
The properties of any selected keyframe can be controlled using the Asset Position and Size section. Changing the asset X or Y properties using the input boxes above, or by clicking and dragging the asset on the stage, will change the position of the asset in that keyframe. If more than one keyframe has been previously created, the position properties will only update in the selected keyframe, and properties will exist in each keyframe. If this is the case, and there are different position values between the two keyframes, SToV will calculate the intermediate values for the object's properties, creating a smooth transition between the keyframes. The same is true for the width and height (Wid and Hei) properties of the keyframe and also the rotation, and the alpha property and tint property when available. Interpolation is an important concept used to inform how an animation is performed between keyframes. Please see the interpolation method section below for more details. In addition to interpolation it is possible to modulate the position, rotation and alpha properties using audio or calculated signals or through using MIDI signals. Use the signal button button to toggle through the different modes available. For more details about using audio and calculated signals see the Setting an Audio or Calculated Signal section below or for MIDI signals see the Setting a MIDI signal section.
The WxH toggle will lock width and height changes to one another ensuring that the proportions during resizing stay fixed. Untoggle to revert behaviour so that height and width changes are independent to one another.
Edit All Keyframes
The Edit All Keyframes toggle, when enabled, links the properties (inc. interpolation method) across all keyframes. When enabled if you change the X, Y, Width, Height, Rotation or Alpha properties the same value will propagate across all the keyframes that have been created for this asset. This does not affect signal or midi properties which are global across all keyframes anyway, nor does it have any affect on the Mask properties (see below).
Asset Alpha and Masking
The Alpha and Mask settings are for controlling the appearance of an asset in two different ways. Alpha is used to vary the opacity of an asset. A value of 0.0 will make the asset fully transparent, whereas a value of 1.0 (default) makes it fully opaque. Alpha can be manipulated in the same way as the position or rotation properties above and can be interpolated over-time using keyframes or modulated using the audio or MIDI signals. Please see the interpolation method section below for more details. The Mask menu allows you to select another asset to use as a mask for the currently selected asset. The Mask menu allows you to select another asset to use as a mask for the currently selected asset.
A mask controls which parts of an asset are visible. Rather than editing the asset itself, you supply a second asset whose brightness is read as an alpha channel and applied to the first. Where the mask has a value of 1.0, the underlying pixel is drawn at full opacity; where it has a value of 0.0, the pixel is hidden entirely. Values in between are partially transparent, so a mask with a soft gradient produces a smooth fade rather than a hard edge. This means the mask asset's own colours are never rendered, only its intensity matters. A common use is a plain white shape on a black background, which cuts the selected asset down to that shape. Because the mask is just another asset, it can be animated or swapped like any other, letting the visible region change over time.
Setting Interpolation Method:

If the green wave icon is selected (as in the above diagram), it is possible to select an interpolation method. Interpolation controls the acceleration and deceleration of an animation between keyframes, and the method chosen has a significant effect on how the movement feels. Keyframes let you focus on defining the key moments in a motion while SToV generates the in-between frames, making the animation process more efficient and flexible to iterate on.
There are three basic modes. linear moves at a constant rate throughout, step jumps from one keyframe value to the next at the half-way point, and none applies no interpolation at all but sharply changes at the next keyframe.
Beyond these, the remaining methods are easing curves, and they follow a consistent naming pattern. Each is made up of a direction and a curve family, so once you know the pattern the whole list becomes straightforward to read:
easeIn…starts slowly and accelerates into the movement.easeOut…starts quickly and decelerates towards the end.easeInOut…does both, easing in at the start and out at the finish.
The curve family that follows the direction determines the character of that acceleration. Each family below is available in all three directions, for example easeInQuad, easeOutQuad and easeInOutQuad:
| Family | Character |
|---|---|
Sine |
The gentlest curve, barely noticeable. Good for subtle drift. |
Quad |
A mild, natural acceleration. A good general-purpose default. |
Cubic |
Noticeably stronger than Quad, with more pronounced speed-up. |
Quart |
Stronger again, with a slow start and a fast finish. |
Quint |
Very pronounced, spending most of the time moving slowly before a rapid change. |
Expo |
The most extreme of the smooth curves, close to stationary then very sudden. |
Circ |
Follows a circular arc, holding steady before turning sharply. |
Back |
Overshoots slightly past the target before settling, giving an anticipatory feel. |
Elastic |
Springs past the target and oscillates before coming to rest. |
Bounce |
Hits the target and bounces off it several times, like a dropped ball. |
Sine through Expo are progressively stronger versions of the same smooth acceleration, so they can be swapped for one another to dial an effect up or down. Back, Elastic and Bounce behave differently, overshooting or rebounding past the target value, which makes them well suited to playful or physical-feeling motion.
Setting an Audio or Calculated Signal:
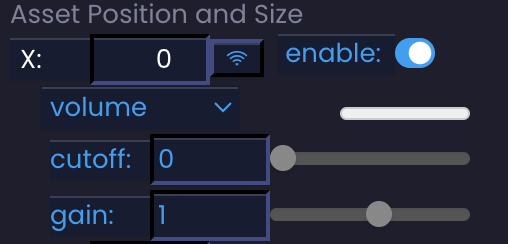
In addition to interpolation, an asset's properties can be modified further using an audio signal, taken either from a microphone or from an audio file. For example, an asset could be made to move as the volume of the music rises past a certain level.
In addition to interpolation, an asset's properties can be modified further by connecting them to a signal. Signals come from two broad families: audio input, taken from imported audio or a live microphone, and programmed signals, which are calculated ahead of time rather than derived from sound. By default the signal mix is selected, but there is considerably more available than that.
With audio input, the signal mix is an amalgamation of all the tracks that have been imported. You are not limited to that, however. Multiple tracks can be imported and any of their audio tracks used as an input, and where a audio is stereo (or multiple track), its individual channels can be accessed separately. Once a source is chosen, a process or band can also be selected, determining which characteristic of the audio actually drives the property. The options are volume and max volume, along with integrated bass, mid and treble, max bass, mid and treble, and RMS bass, mid and treble frequencies.
Programmed signals work differently, being calculated rather than listened for. These include a sine wave, square wave, triangle wave and sawtooth wave, as well as ADSR envelopes of the kind normally associated with MIDI. ADSR presets can be built up and edited using the signal editor dialog. Because these signals are generated rather than detected, you also define when each one starts: at the beginning of the timeline, at the beginning of the asset on the timeline, or whenever a keyframe is applied to that asset.
Three controls shape how the incoming signal is applied. The cut-off sets the level the audio must exceed before it has any effect, on a scale where 0.0 is quietest and 1.0 is loudest. The mRange (modulation range) sets the range the signal is mapped across, so an mRange of 1920 maps the signal onto a span of 0 to 1920. The gain then scales that range, meaning a gain of 1 with an mRange of 1920 spans 0 to 1920, while a gain of 2 spans twice that.
So, to make an asset shift horizontally in response to volume, you would set the 'enable' toggle to 'on' (shown with a blue background), the cut-off to 0.1, the mRange to the stage width, and the gain to 2. The asset would then move across up to twice the stage width, proportionally to the volume of the audio. The behaviour is visible whenever the project is played and audio is detected, and applies on top of any interpolation or MIDI signals that have already been set up.
Three controls shape how the incoming signal is applied. The cut-off sets the level the audio must exceed before it has any effect, on a scale where 0.0 is quietest and 1.0 is loudest. The mRange (modulation range) sets the range the signal is mapped across, so an mRange of 1920 maps the signal onto a span of 0 to 1920. The gain then scales that range, meaning a gain of 1 with an mRange of 1920 spans 0 to 1920, while a gain of 2 spans twice that.
So, to make an asset shift horizontally in response to volume, you would set the 'enable' toggle to 'on' (shown with a blue background), the cut-off to 0.1, the mRange to the stage width, and the gain to 2. The asset would then move across up to twice the stage width, proportionally to the volume of the audio. The behaviour is visible whenever the project is played and audio is detected, and applies on top of any interpolation or MIDI signals that have already been set up.
Setting a MIDI Signal:
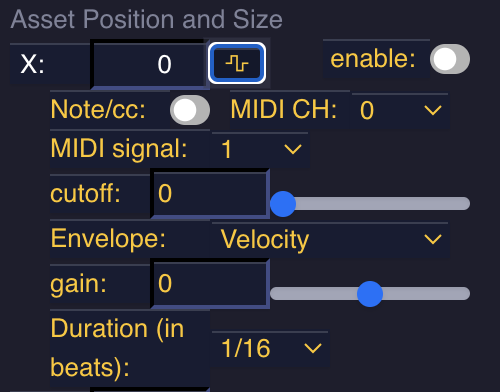
Asset properties can also be driven by MIDI rather than audio. MIDI signal settings are shown with the square wave icon, in orange, distinguishing them from the blue audio signals described above.
Setting one up begins with the 'enable' toggle, which switches the signal on. You then choose whether to listen for a MIDI note or a MIDI controller change, and set the channel, either a specific numbered channel or 'all'. The note number or controller number can then be picked from a list, or captured directly using the 'learn' button, which listens for the next note or controller change received and fills in the value for you. Learn is usually the quicker route when working with a physical MIDI device.
The envelope determines the shape of the response over time. At its simplest this is the velocity or pressure of the incoming MIDI signal, giving a direct impulse. It can instead be a pre-calculated function, including a sine, square, triangle or sawtooth wave, or one of the ADSR envelopes available in the signal editor. ADSR envelopes are what allow a property to follow a musical shape rather than a sharp spike: assigning a drum envelope to a note gives a fast attack and quick decay, while an organ envelope sustains for as long as the note is held. The animation then reflects that envelope rather than simply jumping on each note.
As with audio signals, the cut-off, gain and mRange shape how the resulting signal is applied. These are most intuitive when working with velocity and pressure, but they apply equally to the ADSR and waveform envelopes.
As a worked example, to make an asset shift vertically whenever a particular note is played on channel 3, you would set the 'enable' toggle to 'on', the type to 'note', the channel to '3' (or 'all'), the note number to 67, the mRange to 1080 (the stage height) and the gain to 0.5. The asset would then move by half the stage height, 540 pixels, each time that note fires. The behaviour is visible whenever the project is played and that MIDI note is received, and applies on top of any interpolation or audio signals already set up.
Filters Properties Tab
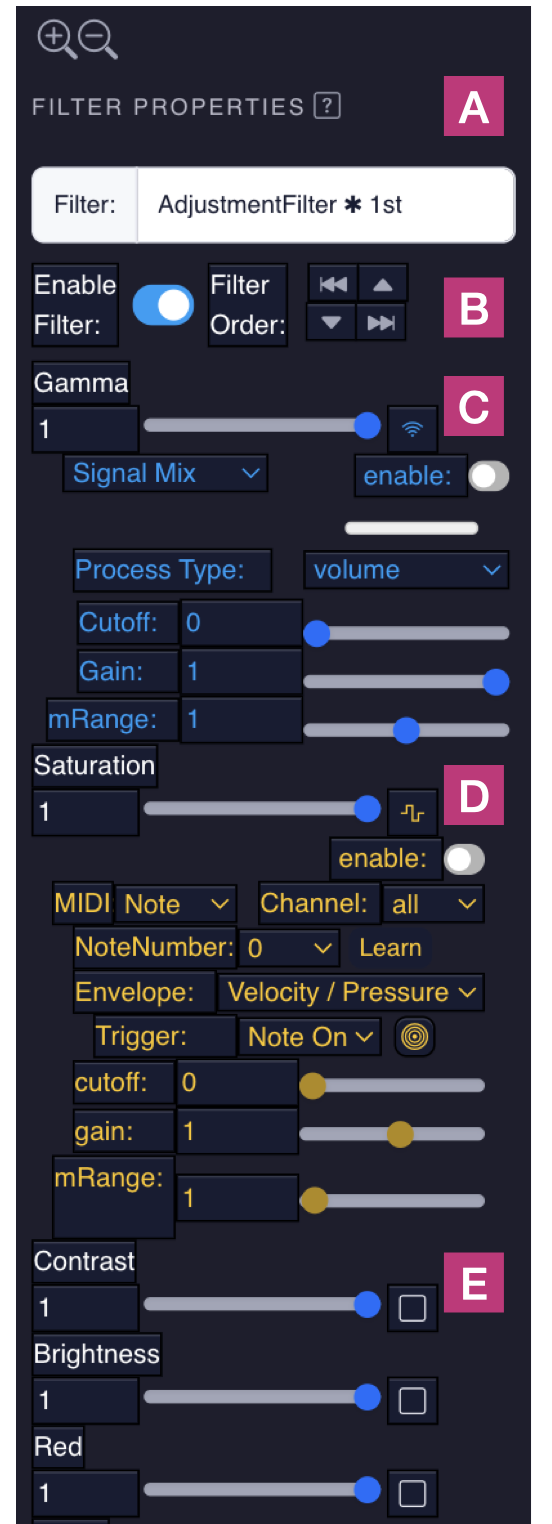
Filters in Sound to Vision are GPU-accelerated effects that can be applied to assets on the timeline, composited together in whatever order they're arranged. In the browser, these are implemented as GLSL/WebGL filters via PixiJS; in SToV Pro, the same filters run natively as Metal filters. A full catalogue of the available filters and what each one does is covered separately in the filters documentation, so this section only describes the interface used to apply and control them.
The filter list (A) shows every filter available to the selected asset. Each is marked with a star if active, or an empty circle if not, and filters are applied in the order they're listed, since the effect is composite, this order can change the resulting look. Alongside each filter (B) is an enable toggle to turn it on or off, plus controls to reorder it: move it to the beginning, move it up, move it down, or move it to the end of the list.
Once a filter is enabled, its individual parameters can each be left at a fixed value or driven by a signal. A parameter driven by an audio or programmed signal (C) is shown in blue. It can be enabled, given a source, either incoming audio or a programmed signal such as a sine wave, and shaped using a cutoff, gain, and modulation range, exactly as with the equivalent asset-property signals described earlier. A parameter driven by MIDI (D) works similarly, but is set up by selecting the note or controller, channel, and note number to respond to, along with a velocity/pressure envelope or a custom envelope, and a trigger of either note-on or note-off. As with audio-driven parameters, a cutoff, gain, and modulation range can then be applied to shape how the incoming MIDI signal affects the parameter.
Parameters that haven't been set to use a signal are shown with an open square (E), and simply display their default value. These can still be changed manually, but will remain static, unaffected by any signal, for as long as the filter is active.
Text Properties Tab
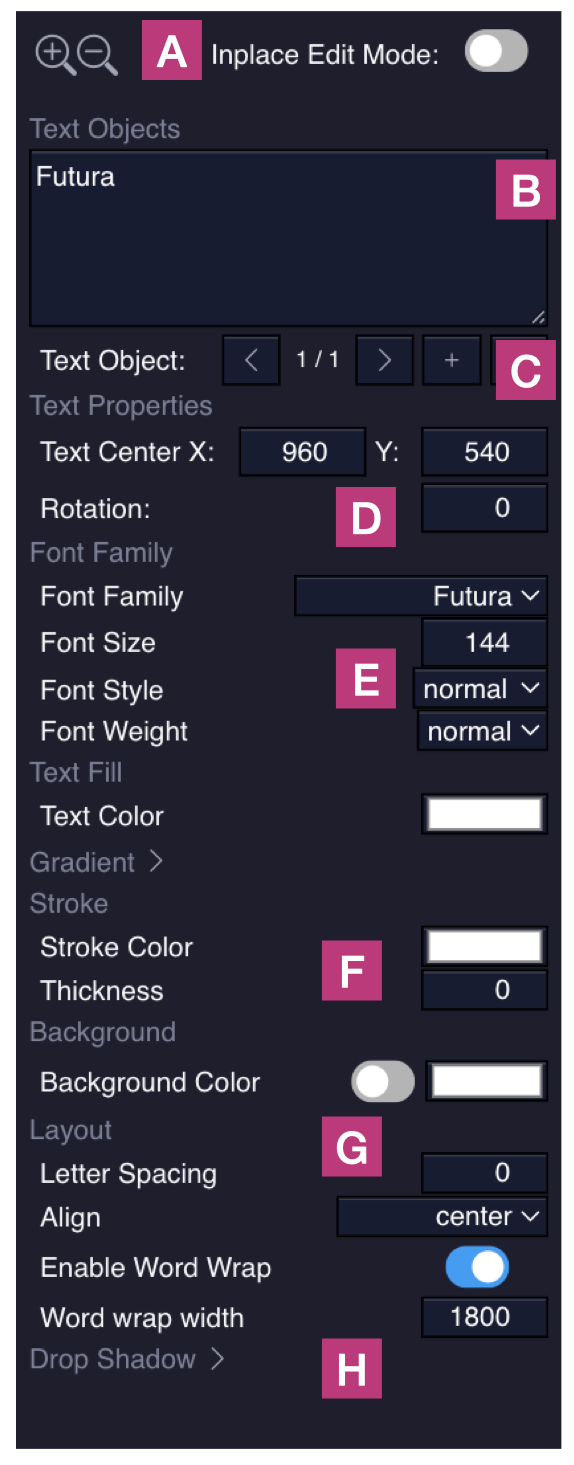
The in-place edit mode toggle (A) changes how text is edited. With it off, text is edited on its own stage at an appropriate scale and resolution, making it clear exactly how the text itself is being shaped. With it on, the text is instead shown as it will actually be rendered on the stage, composited with the other elements around it, giving better context for how everything will look together, though parts of the text may be harder to work with if they end up obscured or if the asset as a whole is resized. Both methods are available so you can switch between them as needed.
The text input (B) is where the displayed text is typed. Text can also be timed to arrive at specific points by inserting a time marker in square brackets, for example [t=0.1], which causes the text preceding it to appear at 0.1 seconds; a marker such as [t=3] would instead cause the preceding text to appear at 3 seconds. An asset can also contain multiple text objects, each styled independently, using the controls at (C) to scroll through existing text objects and add or remove new ones.
Each text object has its own set of properties. Its position on the stage is set with X and Y coordinates, along with a rotation (D). Typography is controlled at (E), including the font family, font size, style and weight, along with the text colour, which can also be set as a gradient blending two or more colours together. A stroke colour and width can be applied at (F), along with an optional background colour that fills the cropped area behind the text when enabled. Layout is controlled at (G), including letter spacing and text alignment relative to the text box, along with an optional word wrap, which uses an accompanying width parameter to determine how wide the text can grow before wrapping onto a new line. Finally, a drop shadow can be applied to the text at (H).
Build Properties Tab
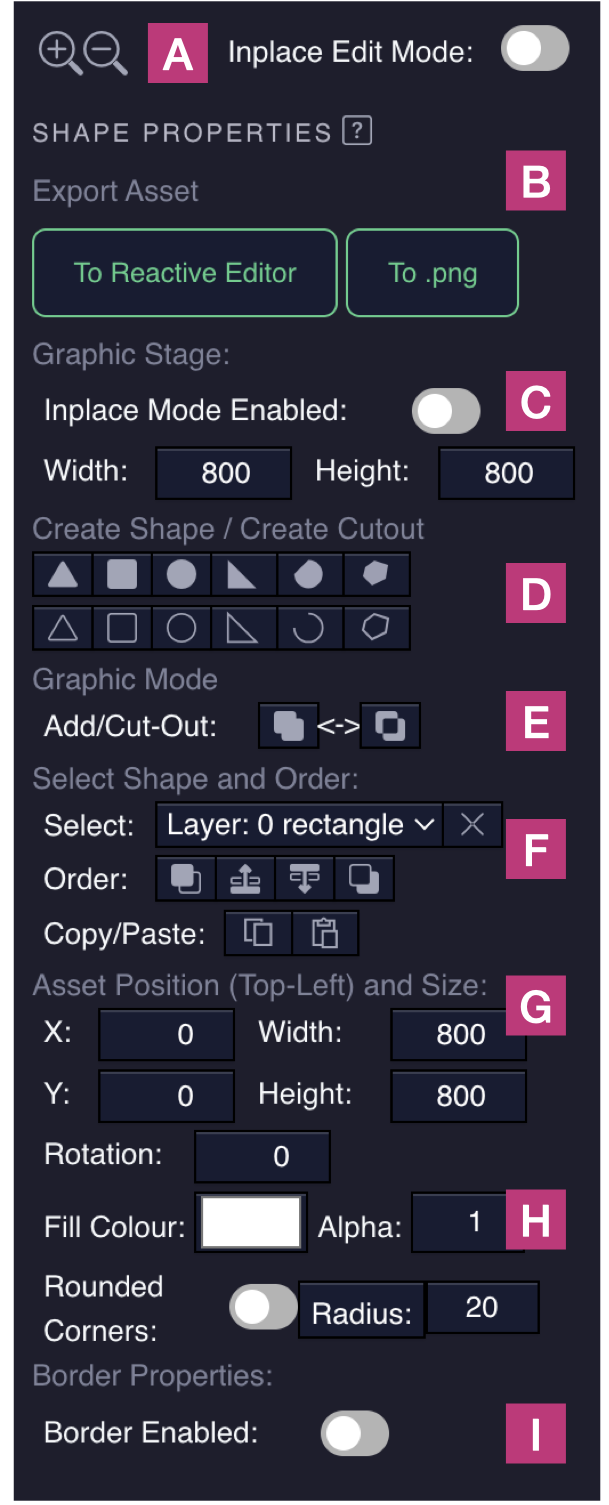
The Build Properties Tab is used to draw shapes directly within SToV and combine them into a single asset. The in-place edit mode toggle (A) works in the same way as the equivalent control in the Text Properties Tab. With it off, the shapes are drawn on their own clean stage, giving a clear overview of what is being built. With it on, the shapes are shown in the context of the wider composition, alongside the other assets, where the asset as a whole may be resized, stretched or partly obscured. Both views are useful at different stages of building a shape.
Once a shape asset has been built it can be exported (B) in one of two ways. It can be sent to the Reactive Editor, where the simple shape primitives are converted into reactive elements that can be made dynamic and connected to different signals using the node interface, described on the Reactive Editor page. Alternatively it can be exported directly as a PNG screenshot. The graphic stage (C) has its own width and height, which define the renderable area of the asset.
Shapes are created using the primitive buttons (D), which include a triangle, square, circle, right-angle triangle, arc and polygon. Each of these is also available as a stroke-only version, drawing just the outline rather than a filled shape. Each shape can be set to one of two modes (E): additive, where the shape is simply drawn onto the stage, or cutout, where the shape is instead subtracted from the shapes beneath it. The ordering controls (F) are used to select, copy and paste the shape primitives on the stage, and to set their z-index with respect to one another.
The remaining controls set the appearance of the selected shape. Its position is defined from the top-left corner (G) using X and Y coordinates, along with a width, height and rotation. The fill (H) sets the shape's colour and its alpha (opacity), and in the case of a rectangle a corner radius can also be applied to round its corners. Finally, any shape can be given a border, and when this is enabled both the thickness and the colour of that border can be set.
The Sound to Vision Menus

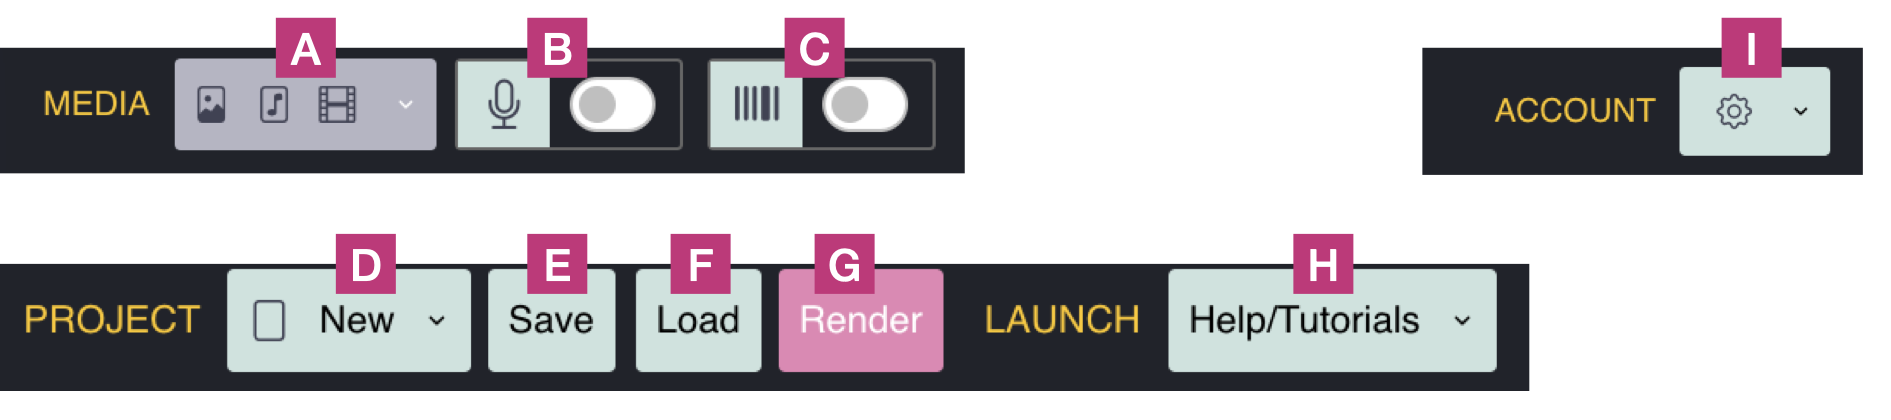
The SToV menus are located at the top of the interface screen and give access to the project's input and output options, covering media import, audio and MIDI sources, video rendering, saving and loading, and account settings.
Import media (A) is used to bring different media files into the project, including audio, video and photos. The microphone (B) can either be opened as a dialog, giving access to its full settings, or simply toggled on and off using whatever settings are already in place. MIDI (C) works in the same way, opening a dialog for the fuller set of options, or toggling straight on and off.
New stage (D) lets you set up a stage with different dimensions. Either way it clears out whatever is currently there, allowing you to start afresh. Export (E) opens a dialog for exporting a SToV archive of your current project, which is essentially a ZIP file. Import (F) brings one of these archives back in. This matters in the browser version, where file access is limited, since packaging a project into an archive keeps everything neatly contained in one place.
Render (G) opens the render dialog, where a video of your project can be rendered out. The Reactive Editor (H) opens in another tab, and is where dynamic graphics are created. Help and tutorials (I) gives access to the interactive tutorials along with links to this documentation.
The remaining controls cover your account. Sign in and out (J) is needed for certain features in the browser version, and Create account (K) takes you to the account creation page. Settings (L) is where you can manage your account, view the keyboard shortcuts, send feedback and find out more about Sound to Vision.
The SToV menus are located at the top of the interface screen and facilitate the user to access input and output options for audio, video rendering as well as save and load functionality for the project as well as account settings.
The SToV menus are located at the top of the interface screen and give access to the project's input and output options, covering media import, audio and MIDI sources, video rendering, saving and loading, and application settings.
Import media (A) is used to bring different media files into the project, including audio, video and photos. The microphone (B) can either be opened as a dialog, giving access to its full settings, or simply toggled on and off using whatever settings are already in place. MIDI (C) works in the same way, opening a dialog for the fuller set of options, or toggling straight on and off.
New stage (D) lets you set up a stage with different dimensions. Either way it clears out whatever is currently there, allowing you to start afresh. Save (E) opens a dialog for saving your project directly to your file system. Load (F) lets you browse the file system for saved projects, and can also import SToV archives.
Render (G) opens the render dialog, where a video of your project can be rendered out. Help and tutorials (H) gives access to the interactive tutorials along with links to this documentation. Settings (I) is where you can view the keyboard shortcuts, send feedback and find out more about Sound to Vision.
New Empty Stage
This button when clicked provides a menu. The options represent the form factors for the stage. Clicking one of the options will create an empty stage with the dimensions selected. The options represent many of the common form factors for popular social media platforms:
- Default 1920x1080, 3840x2160 (16:9)
- Instagram 1080x1920, 3840x2160 (9:16)
- Instagram 1080x1350, 2160x2700 (4:5)
- YouTube 1920x1080, 3840x2160 (16:9)
- YouTube 1080x1080, 2160x2160 (1:1)
- Twitter 1280x720, 2560x1440 (16:9)
- Twitter 720x720, 1440x1440 (1:1)
- Twitter 720x1280, 1440x2560 (9:16)
When selected an empty stage will be created, and all assets cleared from the Timeline. 4K resolution is also available when rendering, in essence doubling the quoted resolutions above. The number of pixels represents the stage dimensions rather than the absolute display resolution at any one point.
SToV-Pro displays at 4K as a default.
Import Audio
To get the most from SToV it is important to import or create signals. One way of doing this is to import audio music into the project. This can be done with the 'Import Audio' menu. Either choose from a number of demo tracks or import your own music, in one of a number of popular formats (*.mp3, *.wav, *.ogg, *.mp4), please check your browser for all supported formats. Once imported your audio sound wave will appear visualised on the 'TimeLine View', in addition the frequency distribution of your audio will appear on the 'Underlying Frequency Distribution' view. By default, your imported audio will also be exported to any rendered videos you make from this project.
Turn On Microphone
Another input signal available to users with a microphone is accessible with the 'Turn on Microphone' button. Upon clicking, your browser will ask permission to use the microphone. If you agree to this request, the microphone will provide signal to the SToV interface. This will wipe any imported audio from the interface, and the signal is only usable for live performances, not in rendered signals, as it is not recorded. If your system has multiple microphones, the interface will use the 'default' device of your browser. To change the microphone, access your browsers settings, change the microphone and then refresh the soundtovision.com webpage to be sure of applying the change.
Import MIDI
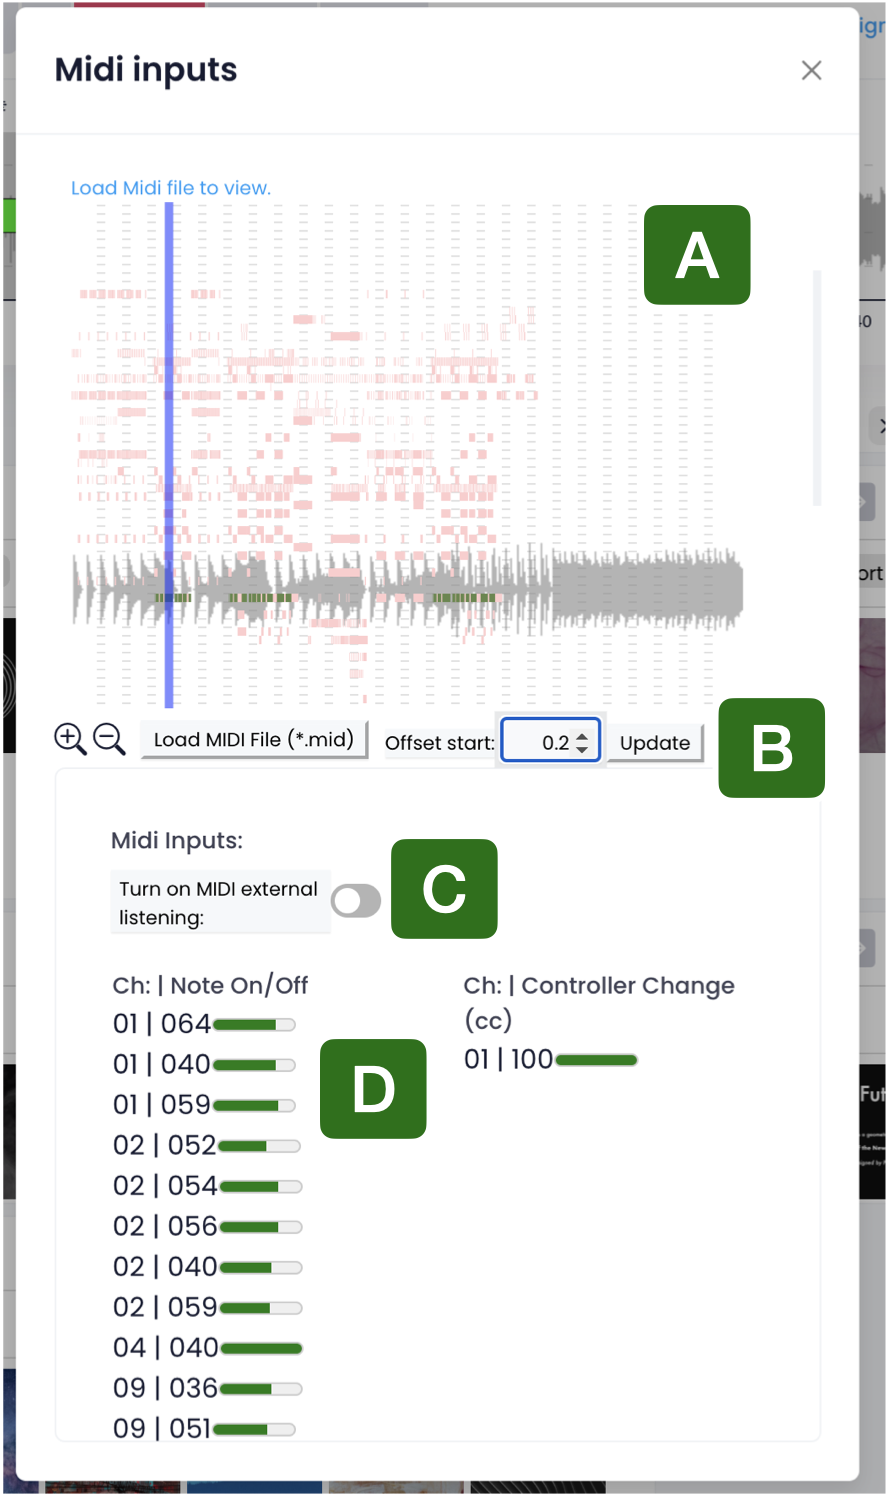
MIDI (Musical Instrument Digital Interface) is a music format for creating signals which can be used to control visual elements in SToV. The 'MIDI Dialog Screen' allows you to import MIDI files (*.MID, *.mid) using the 'Load MIDI File' button. Selected files of the correct format will load and the MIDI signals will be visualised on the 'MIDI View'. Some MIDI files are not synched with the start of audio files they are associated with. To synchronize the files, the 'Offset start' input can be used to offset the MIDI signals by a delay in seconds. The 'Update' button applies this offset to the MIDI signal. The 'Turn on MIDI external Listening' button allows you to toggle SToV's access to MIDI signals being created by a MIDI device connected to your computer in real-time. When MIDI signals are playing either when the timeline is being played and a saved file is loaded, or external devices are playing it is possible to see what notes and controllers are active with the 'MIDI Notes and Controller Signals' area. Incoming signals will be displayed along with their velocity. This can serve as a guide to inform which signals to listen on when creating visual elements which are going to be reactive to these inputs. The MIDI channel and note/controller are displayed for each incoming signal.
Render
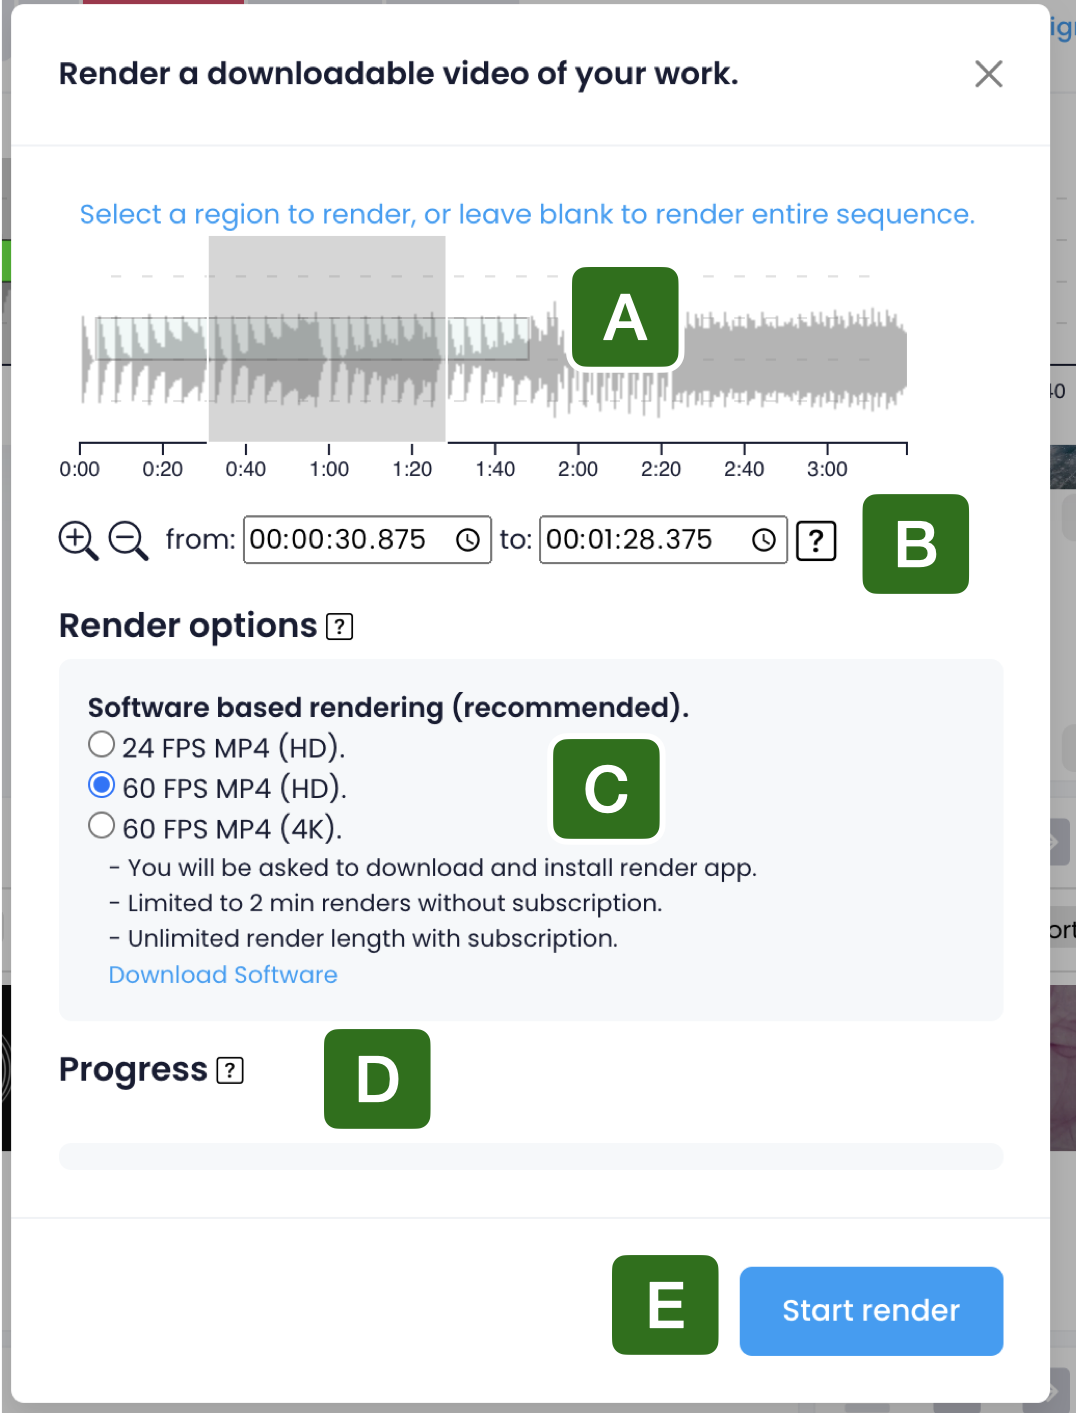
By clicking the 'Render' button on the menu bar, the Render Dialog Screen opens. This functionality is used for creating downloadable video copies of your creations. Several options are available. It is possible to render out some or all of your video by clicking and highlighting the 'Render Timeline View'. Alternatively you can type in the desired temporal range using the time input boxes on the 'Render Timeline Controls' toolbar. There are multiple render options. Click an option to set the rendering mode:
- 24 FPS MP4 (HD) - Will render a 24 FPS version of your video, quick to produce, good for previewing
- 60 FPS MP4 (HD) - Will render a 60 FPS version of your video at the default video quality
- 60 FPS MP4 (4K) - Will render a 60 FPS version of your video at 4K resolution, slower but high quality.
The computational settings (D) control how much of your machine the renderer is allowed to use. Here you can set the number of cores and the CPU utilisation of the Node.js renderer. Allocating more cores will generally render faster, though leaving some headroom is worthwhile if you want to keep using the computer for other things while a render runs.
The render itself is started from the buttons at (F). Because rendering is handled by a separate render app rather than the browser, that app needs to be running first. If it is not currently loaded, a 'Connect' button will appear in place of 'Start render'. Clicking 'Connect' will attempt to launch the render app if it is already installed on your computer. If it is not installed, you will need to download it first, using the download link near the computational settings (D).
Once the render app is connected, click 'Start render'. The SToV render app includes software acceleration for rendering, which allows videos to be produced at high speed and efficiency in MP4 format. When the render finishes, your video will appear in the 'download' directory of your computer. If the renderer will not connect, this usually indicates a problem with the render app itself, and the frequently asked questions page has more detail on diagnosing it.
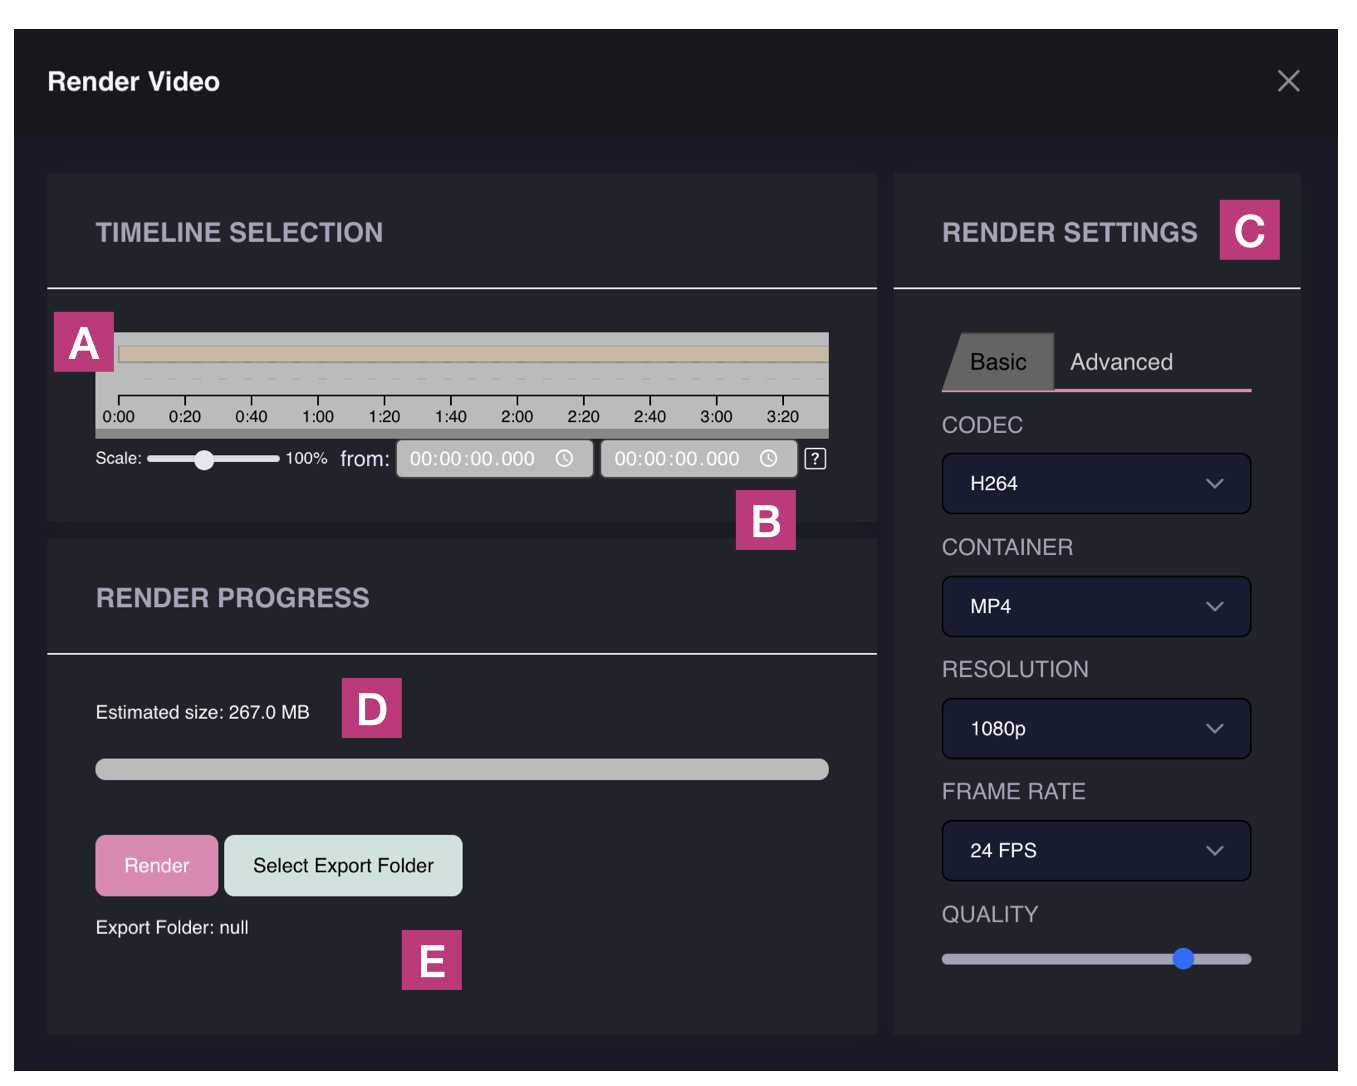
The render dialog is used to export your project as a video file. The render timeline view (A) shows the project timeline, and the render timeline controls (B) are used to select the region you want to render and to scale the view while doing so, allowing you to render either the whole project or a specific section of it.
The render settings (C) determine the format of the exported file. Several codecs are available: H.264 and H.265 for general use and wide compatibility, and ProRes 422, ProRes 422 HQ and ProRes 4444 for higher-quality, edit-friendly output. The file can be written to either an MP4 or MOV container, at a resolution of 1080p, 1440p or 4K, and at 24, 30 or 60 frames per second. When rendering with H.264 or H.265, a quality setting is also available to balance file size against visual fidelity.
An advanced tab provides finer control for those who need it, allowing the bit rate to be overridden directly and the keyframe interval to be set.
Save
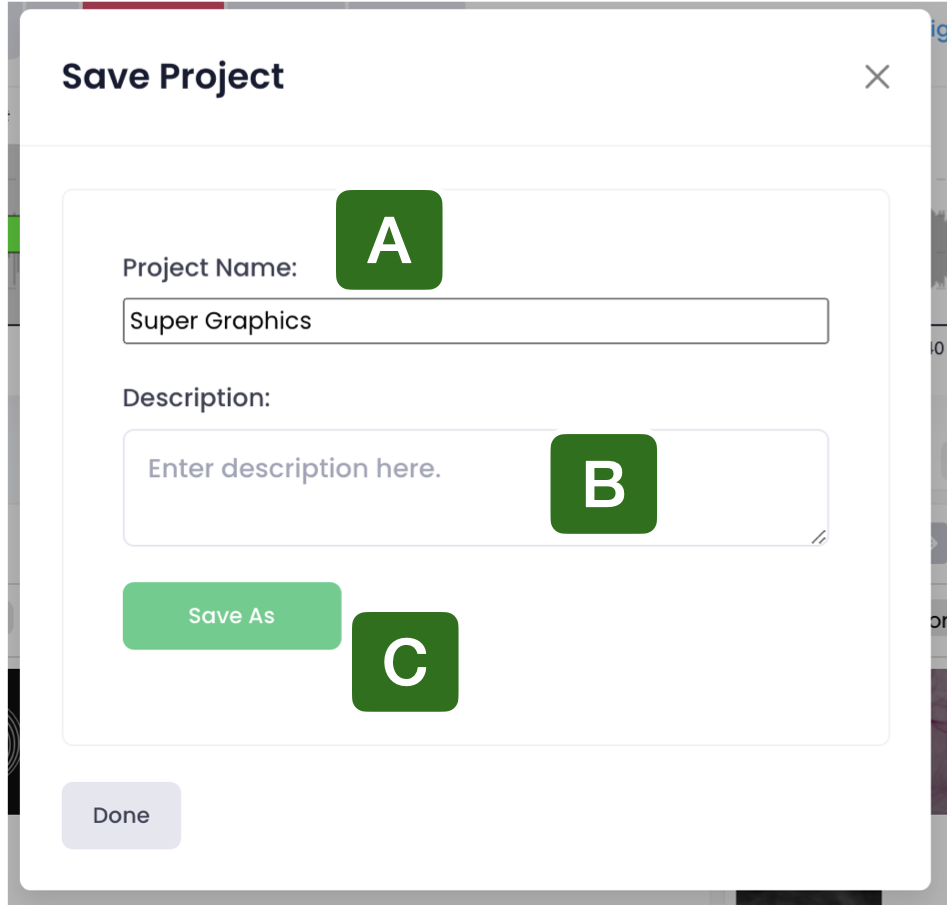
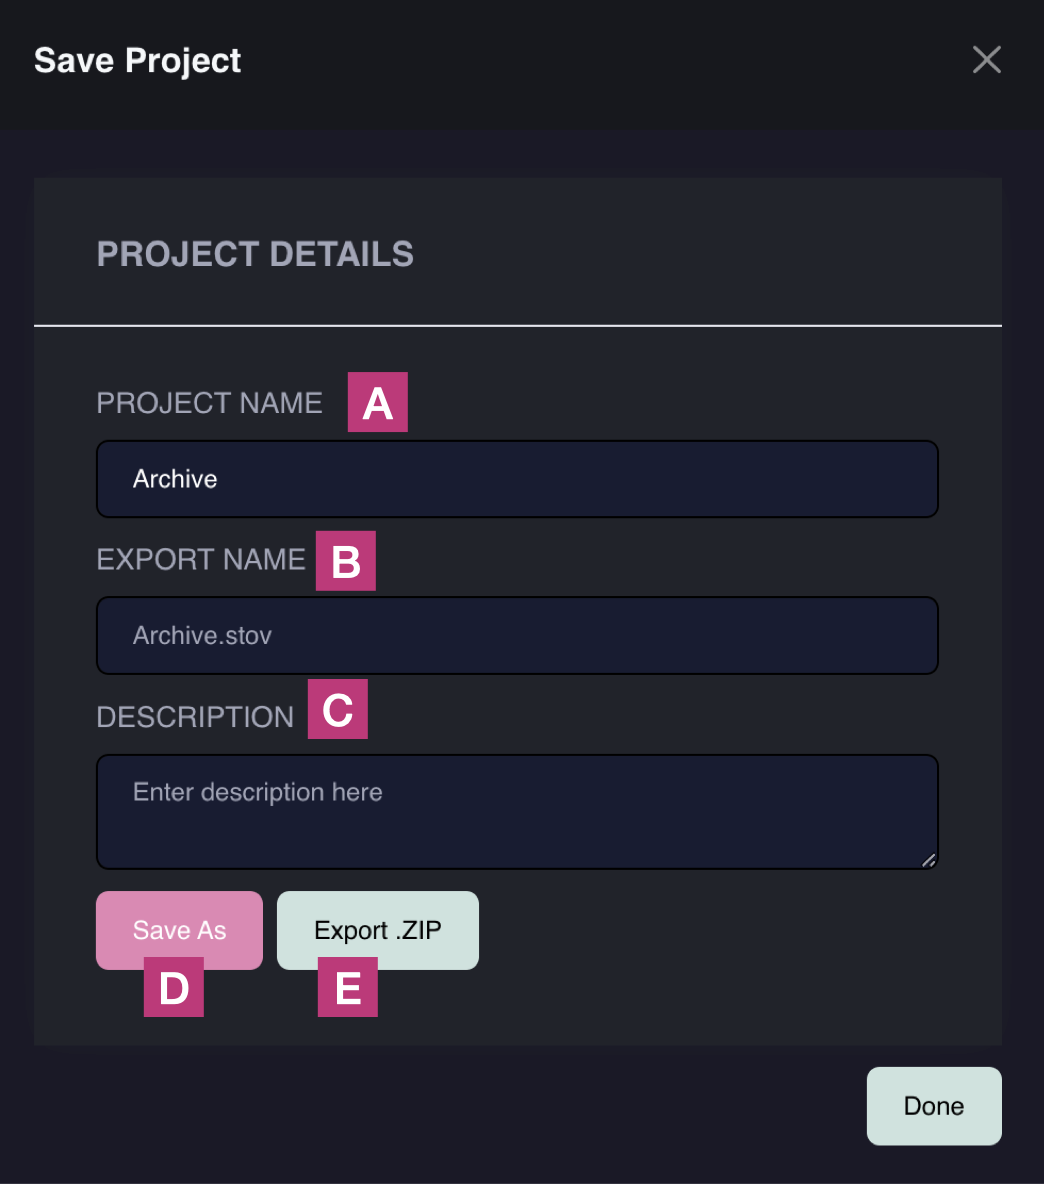
In the browser version, projects are exported as a single .stov archive, which is essentially a ZIP file containing the project and its media together. Give the project a 'Project Name' and a 'Project Description' for quick reference, then export the archive to download it. Because the browser has limited access to your file system, packaging everything into one archive keeps the project and all of its assets contained in a single file, which can then be imported again later.
In SToV Pro, projects are saved directly to your file system. Give the project a 'Project Name' and a 'Project Description' for quick reference, then choose where to save it. Media is referenced from its location on disk rather than being packaged or uploaded, so there is no upload step and no size limit beyond your own available disk space. Saved projects can be browsed and loaded straight back from the file system.
Load
soundtovision.com being in a browser can only import projects that have been exported as an .stov archive or .zip file. SToV-Pro can open projects that have been directly saved to the hard-drive.
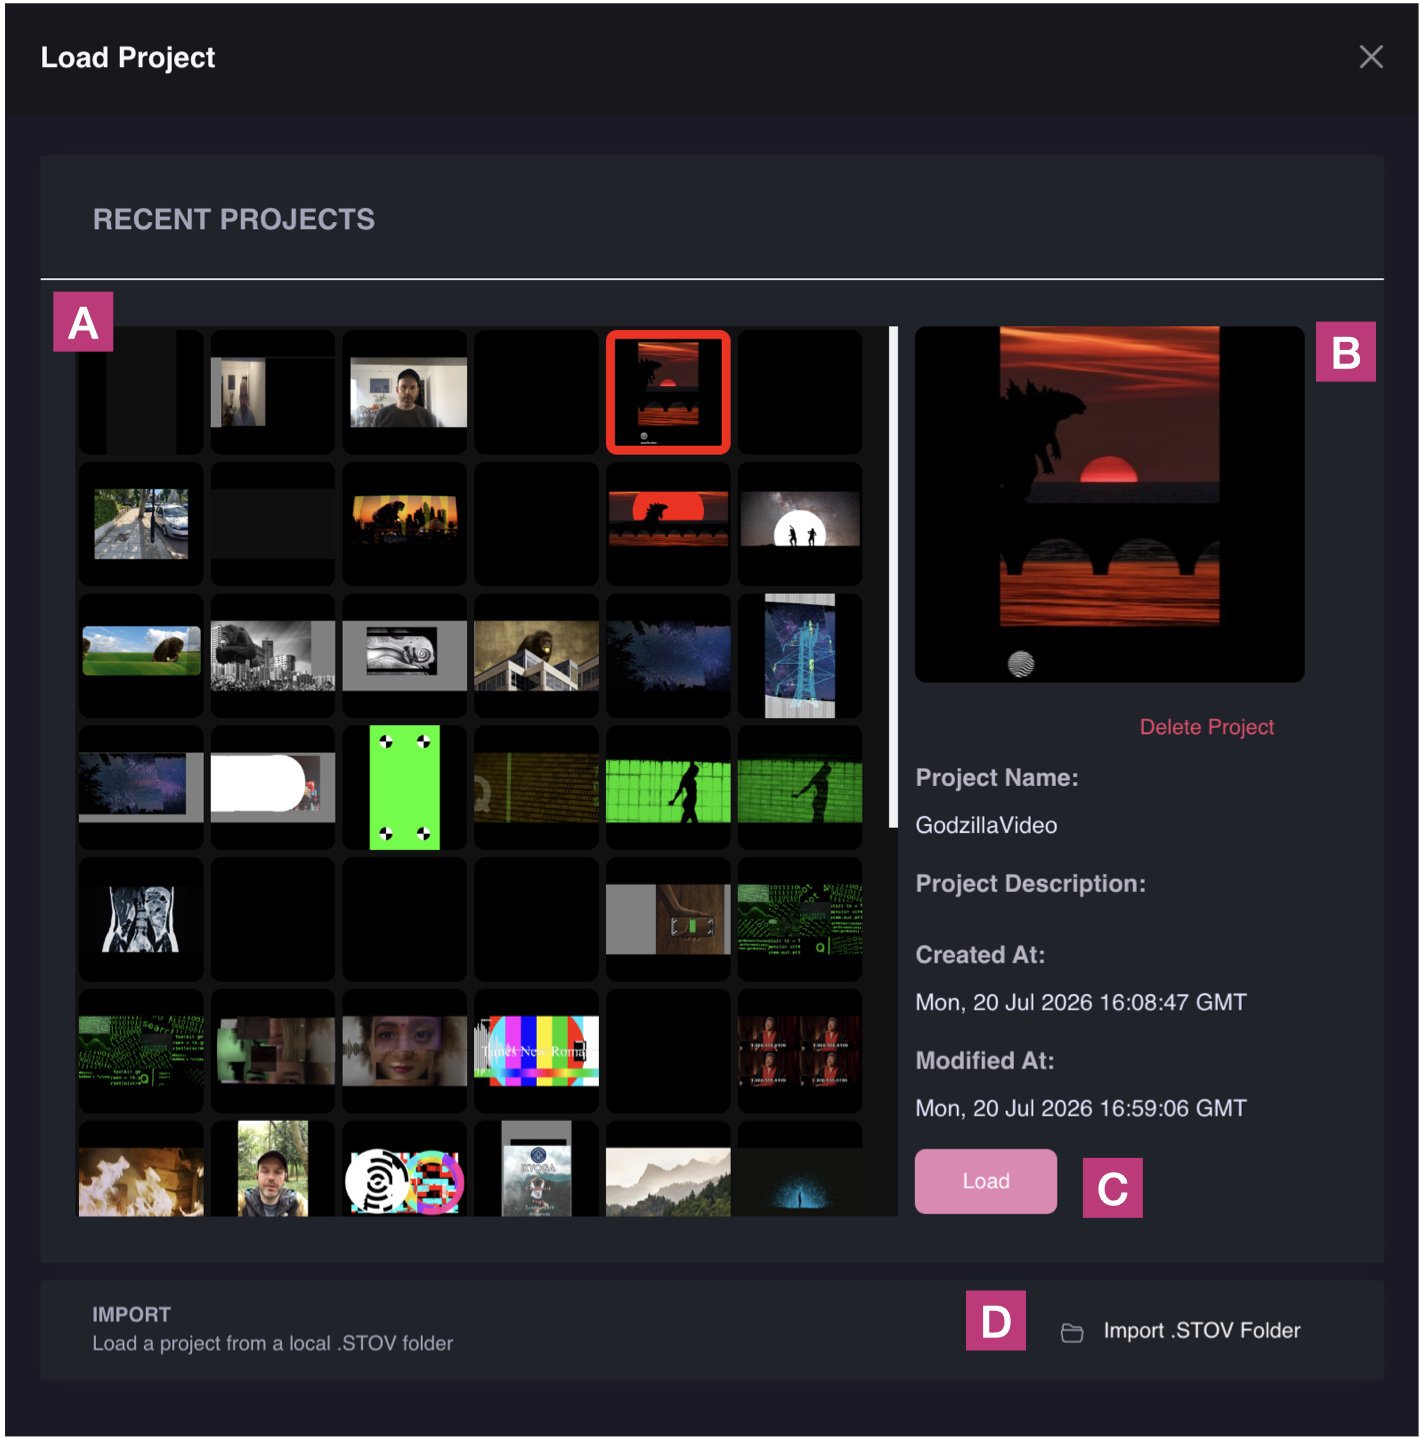
The 'Load Project Dialog' is used to load projects that have been previously saved. Browse projects by their thumbnail using the 'Project Grid View', click a project to preview its name and description. Click the 'Load' button to load the project onto the timeline.
Sign In/Out
To get the most from SToV's features it is necessary to create an account and to sign in. By signing in you gain access to AI and other member features. To create an account and get access to SToV's exclusive membership features please use this link: Create Account
Tutorials
Learning to use SToV is very straightforward with these interactive tutorials, click and access the tutorials in order to learn how to use SToV and its various features.
Account Settings
The account settings menu allows users to access important settings for their account. From this menu users can access several functionalities
- Manage Account - Subscribe to newsletter, change name and email settings, cancel account.
- Keyboard Shortcuts - View keyboard shortcuts for using SToV in optimised way.
The Assets
Assets are the workable elements of a timeline, the building blocks you arrange in time and across layers to compose a project. Several types are available, each suited to a different kind of material, and all of them are placed and manipulated on the timeline in the same way.
Media Types Supported by SToV
Assets can be created by the user dragging in files from their computer. The types of imports that Sound to Vision supports are summarised below, and can be broadly characterised as image, video, sound and miscellaneous types. Image types that can be imported include:
- PNG (.png) - Portable Network Graphics
- JPEG (.jpg, .jpeg, .JPG) - Joint Photographic Experts Group
- WEBP (.webp) - Web Picture
- SVG (.svg) - Scalable Vector Graphics
Video types supported
- MP4 (.mp4) - MPEG-4
- WEBM (.webm) - Web Matroska
- MOV (.mov, .MOV) - QuickTime File Format
Sound types supported
- OGG (.ogg) - Ogg Vorbis Audio
- WAV (.wav) - Waveform Audio File Format
- MP3 (.mp3) - MPEG-1 Audio Layer 3
Miscellaneous types which are supported
- ZIP (.zip) - ZIP Archive
- JSON (.json) - JavaScript Object Notation
- STOV (.stov) - Sound to Vision's own format for project files.
These formats are all supported by SToV with the images and videos forming assets when they are imported. The STOV type can be imported but does not form assets specifically, though a stov asset will often contain a number of assets which will populate the 'Imported' asset card when it is loaded.
Asset Cards
Assets in SToV are organised as image tiles on asset cards. Each card contains mutable tags some of which relate directly to the class of the asset others which are optional. The assets which appear on a particular card are dependent on the tags present. As standard, SToV has multiple cards each with different tags which can be used to filter the available assets in different ways. For example, if a card has the tag 'video', only assets which are videos will appear on that card, whereas 'photo' would filter all the assets and show only photo assets in that card. If a video is more than 30 s in duration, it will also have the keyword 'long'. Tags that represent specific asset types (e.g. 'video', 'photo' etc) are blue whereas, optional tags are grey (e.g. 'long'). An additional important tag is 'imported' which represents all assets which have been imported by the user. By combining the tag 'imported' with for example the 'video' tag will result in that card only showing videos that the user has imported.

Figure 1. An asset card with the 'imported' tag
The above figure shows an asset card with the 'imported' tag, in addition it shows several buttons at the top of the card and the asset tile icons below the tags and a 'x' button below the tile icons. The 'x' button allows the user to remove these assets from SToV asset pool but it doesn't actually delete the underlying media file from the computer, nor will it remove the asset from the timeline. The controls at the top of the asset card allow the user to manipulate the card. The first icon (the horizontal bars) can be clicked and allows the whole card to be dragged. Through dragging the card into other cards it is possible to change the order and position of the cards. The order and tags will be remembered by the browser between sessions. If there are many asset present in a card the arrow control buttons can be used to browse through them.
Video assets have a video attached and play back in sync with the timeline. Photo assets work the same way but hold a still image. Webcam assets behave much like a video asset, except that the source is your webcam, captured live and displayed on the timeline, which makes them useful for performance and for anything responding to what is happening in the room.
Primitive assets are simple shapes. These can be edited in the Build tab, where further shapes can be added to the same asset, so quite complex representations can be built up from basic parts. Primitives can also be imported into the Reactive Editor and made dynamic. It is worth knowing that this is a one-way step: once a primitive has been taken into the Reactive Editor it becomes a reactive element and can no longer be edited in the Build tab, though it can of course still be edited in the Reactive Editor itself.
Reactive elements can therefore arrive in a project in two ways. They can begin life as a primitive that is later made dynamic, or they can be built from scratch in the Reactive Editor. Either way they behave as a single asset once placed on the timeline.
Text assets hold editable text and come with a Text tab, where the text itself is written and styled. A single text asset can contain multiple text objects, which can be set to appear at different points in time.
Finally, the stack is a more specialised asset. A stack is a collection of photos that can be switched between at high speed, with animations available for the transitions between them. This makes stacks well suited to rapid image changes, for instance cutting on a beat or switching in response to an input signal.
The Timeline
The Timeline and its associated buttons allow the user to create compositions of their assets, arranged by time and depth. Import assets by simply dragging and dropping them onto the Timeline. By placing photos, text and videos and other elements in different layers it is possible to create unique compositions which transform through time. Copy, paste, split, and trim directly on the Timeline for precision temporal editing.
Timeline Controls

The 'Timeline Controls' largely affect the mechanics of the timeline, but also have other uses. The timeline zoom slider (A) allows the user to zoom in and out of the timeline along the time axis. Zooming out shows a larger portion of the project timespan, while zooming in allows the user to discriminate subtler transitions. Alongside this, the asset display toggle (B) switches the timeline between its normal view and a compact, low-resolution view, which is useful for keeping things readable when a project has a large number of assets on screen at once. A project can have many layers on which to order and organise assets, and the user can add or remove these layers (C) to control the number available exactly.
Three shortcut panels sit alongside these controls. The Spectrum shortcut (D) opens a panel showing the frequency distribution of the loaded audio. The Signals shortcut (E) opens a panel for creating modulation signals, such as a sine wave, which can then be used to drive other parameters elsewhere in the project. The Loop Region panel (F) allows the user to mark out and loop specific sections of the timeline, useful for focusing on and refining a particular part of a project.
The playpoint time indicator (G) shows the current position of the play point on the timeline. From here, playback can be started and paused (H), reset back to the beginning of the timeline (I), or set to loop continuously (J). The play point centring toggle (K) keeps the play point fixed at the centre of the view, scrolling the timeline underneath it as playback progresses, rather than the play point moving across a static timeline.
The remaining controls act directly on assets. An asset can be deleted from the timeline (L), and keyframes can be created for it (M) to control how its properties change over time. Assets can also be copied (N) and pasted (O) to quickly duplicate elements across the timeline. For more advanced use, an asset's details can be copied as Python code (P), ready to use with the Sound to Vision API, documented separately. Finally, the input volume meter (Q) displays the current level of the incoming audio signal which is useful for monitoring overall inputs.
Timeline View
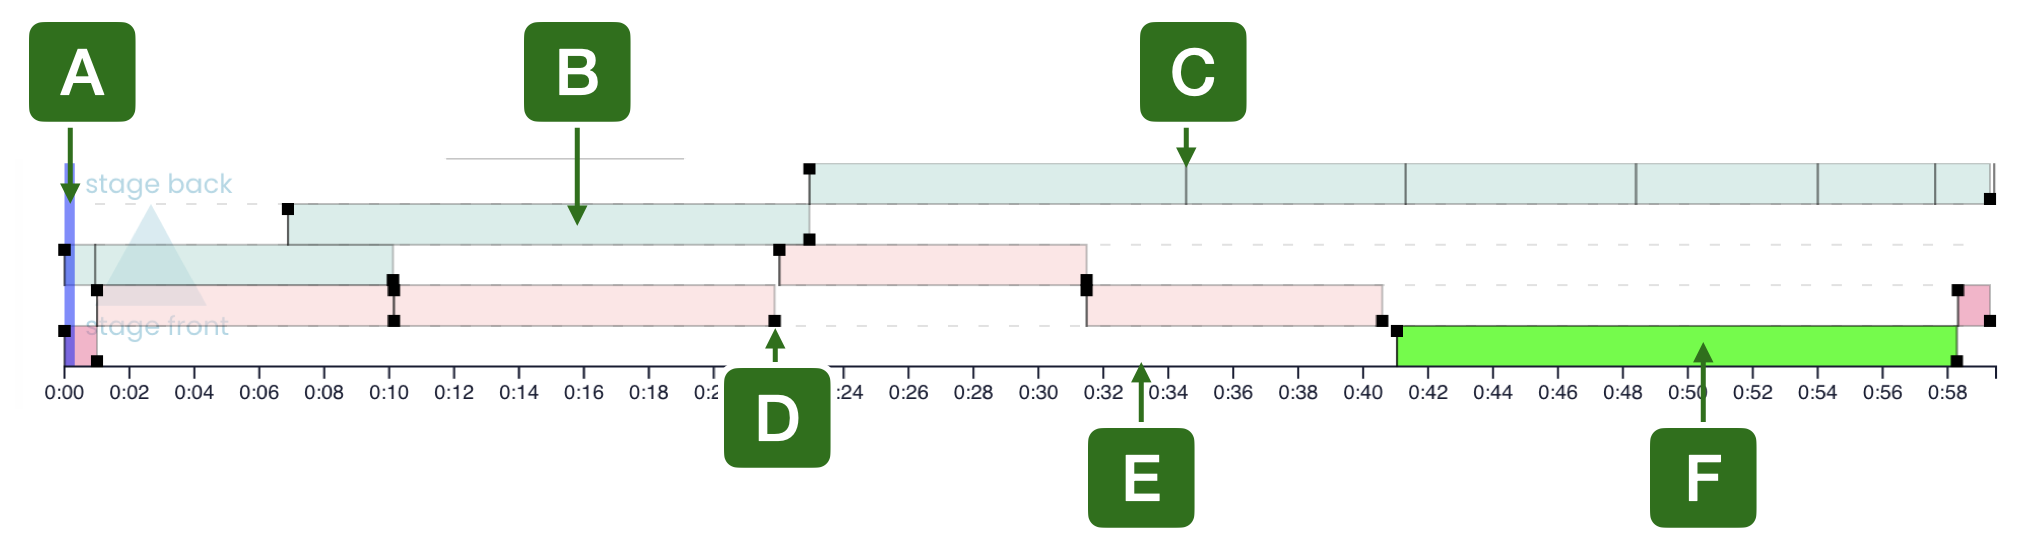
The 'Timeline View' is where assets are arranged in terms of layer (depth, z-index) and through time, with the asset's boundaries representing when it appears and disappears. Assets can be dragged and placed directly onto the Timeline View from the asset cards section (to the right), doing this will make the asset occupy the entire available time on that layer. Alternatively, click and drag an area of the view (highlighted in grey) and then drag an asset onto that area, allowing you to define a specific layer and time span for the asset in one step, without needing to reposition it afterwards.
Once placed, an asset can be dragged to a different layer, and its span adjusted using the handles at each end: the start handle (E) changes where the asset begins, and the duration handle (D) changes where it ends. In both cases the asset is displaced or extended rather than cropped. Different asset types are shown in different colours for easy visual reference. To find out more about the individual asset types, please visit the assets page.
Assets can be selected by double-clicking with the left mouse button; the selected asset is highlighted in bright green (F), while all other assets remain in more subdued tones. Selecting an asset focuses the Properties view on it and shows its spatial anchors in the 'Stage' context. Assets don't need to be selected to be moved around the Timeline View, but they do need to be selected to be moved around the 'Stage'. Where an asset's properties change over time, this is controlled using keyframes (C), single-frame check-points placed directly on the asset in the timeline, marking where its animated properties are set.
Audio assets appear on the timeline as a stereo waveform (I) and can be repositioned and resized using the same start and duration handles as any other asset, though unlike visual assets they cannot be dragged between layers. Above the timeline, the Spectrogram (H) shows a combined visualisation of every audio signal currently imported into the project. Multiple audio signals can be imported and visualised simultaneously.
The 'Playpoint' (A) represents the current time position of the project, determining which assets are visualised on the stage at that moment. The Playpoint's position and the Playpoint Time Indicator are directly linked, so changing one is reflected in the other. The Playpoint can be clicked and dragged along the timeline, updating the Playpoint Time Indicator and the appearance of assets on the stage in real time as it moves.
Timeline Tool Panels
Spectrogram Panel
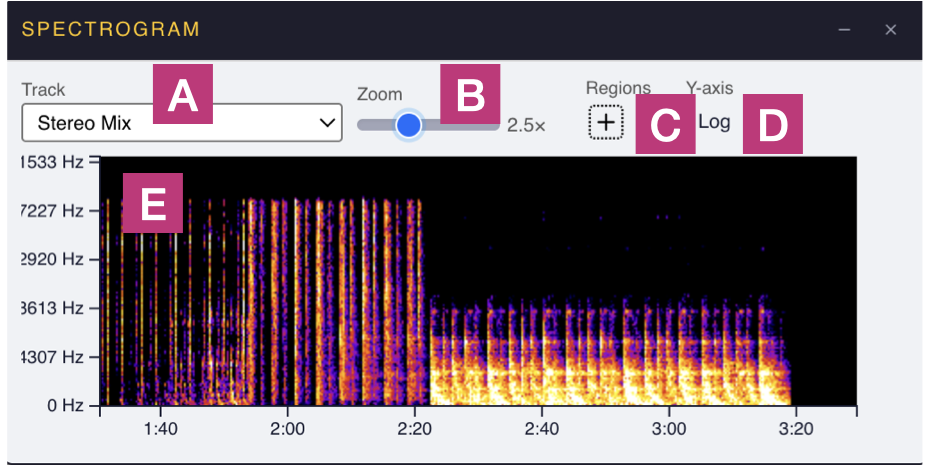
The Spectrogram panel visualises the frequency content of your imported audio over time. The track selector (A) chooses which audio is displayed, either the stereo mix or any of the individual audio tracks that have been imported. The scale zoom (B) adjusts the zoom level of the spectrogram display.
The add region button (C) allows specific regions to be drawn directly onto the spectrogram. These regions can then be used as targeted areas to sample from when modulating asset properties, letting a property respond to a particular band of frequencies rather than the audio as a whole. The axis control (D) switches the frequency axis between logarithmic and linear scales. The spectrogram itself (E) plots frequency against time, showing the distribution of frequencies across the track.
Signal Editor Panel
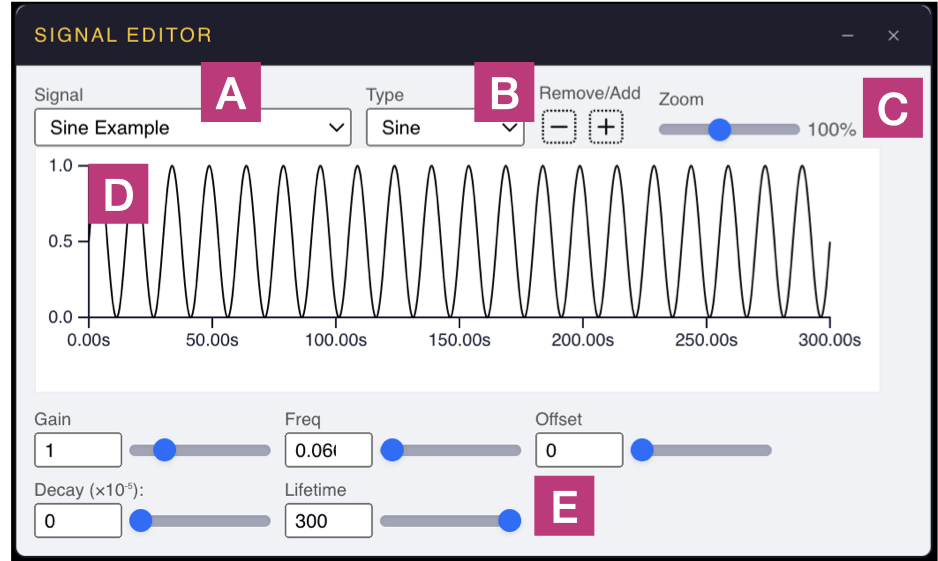
The Signal Editor panel is used to create and shape the programmed signals that can drive asset properties. The signal selector (A) shows which signal is currently being edited. SToV ships with a set of example signals, whose names reflect their type, such as sine example and square example. Signals you create yourself are named sequentially instead, as user 1, user 2 and so on. The type selector (B) sets which kind of signal is created, with the plus button adding a new signal of that type and the minus button alongside removing one.
The zoom scale (C) adjusts the zoom level of the signal plot (D), which displays the signal's gain, between 0 and 1, against time. This gives a clear view of the shape the signal will follow when applied to a property.
The parameters (E) vary according to the signal type selected. Waveform signals such as sine, square and sawtooth share a common set of controls, including gain, frequency, offset, decay and lifetime. ADSR envelopes have their own parameters, following the usual attack, decay, sustain and release structure. Custom signals have no numeric parameters at all, since their shape is defined by adding and removing points directly with the mouse.
Loop Editor Panel
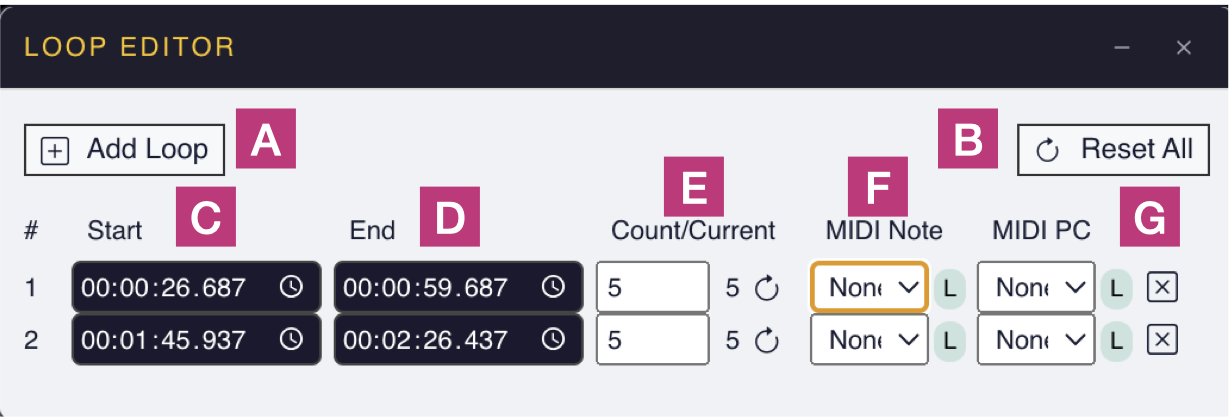
The Loop Editor panel is used to define and control looped regions of the timeline. To create a loop, first highlight the section of the timeline you want to repeat, which sets the loop's start and end points, then click the add loop button (A) to add it to the editor. The reset all button (B) restores every loop in the list to its initial count, which is useful once loops have played through and their counts have been reduced.
Each loop in the list has its own row of settings. The start time (C) and end time (D) define the extent of the loop, and both can be clicked and edited manually if you need to adjust the region precisely. The count (E) sets how many times the loop should repeat. This steps down as the loop plays, and the refresh button alongside it resets that individual loop back to its initial count, where the reset all button (B) does the same for every loop at once. Setting the count to -1 causes the loop to repeat indefinitely until you break out of it manually or stop playback.
Loops can also be triggered by MIDI, which is useful during a live performance. The MIDI note field (F) assigns a note to the loop, and when that note is played the play point jumps to the start of the loop. Next to it, the 'L' button listens for the next note received and fills the field in automatically, saving you from entering the number by hand. The MIDI program change field (G) works the same way but listens specifically for program change messages, and has its own 'L' learn button. Finally, the 'X' button alongside removes that loop entry from the editor.
The Stage
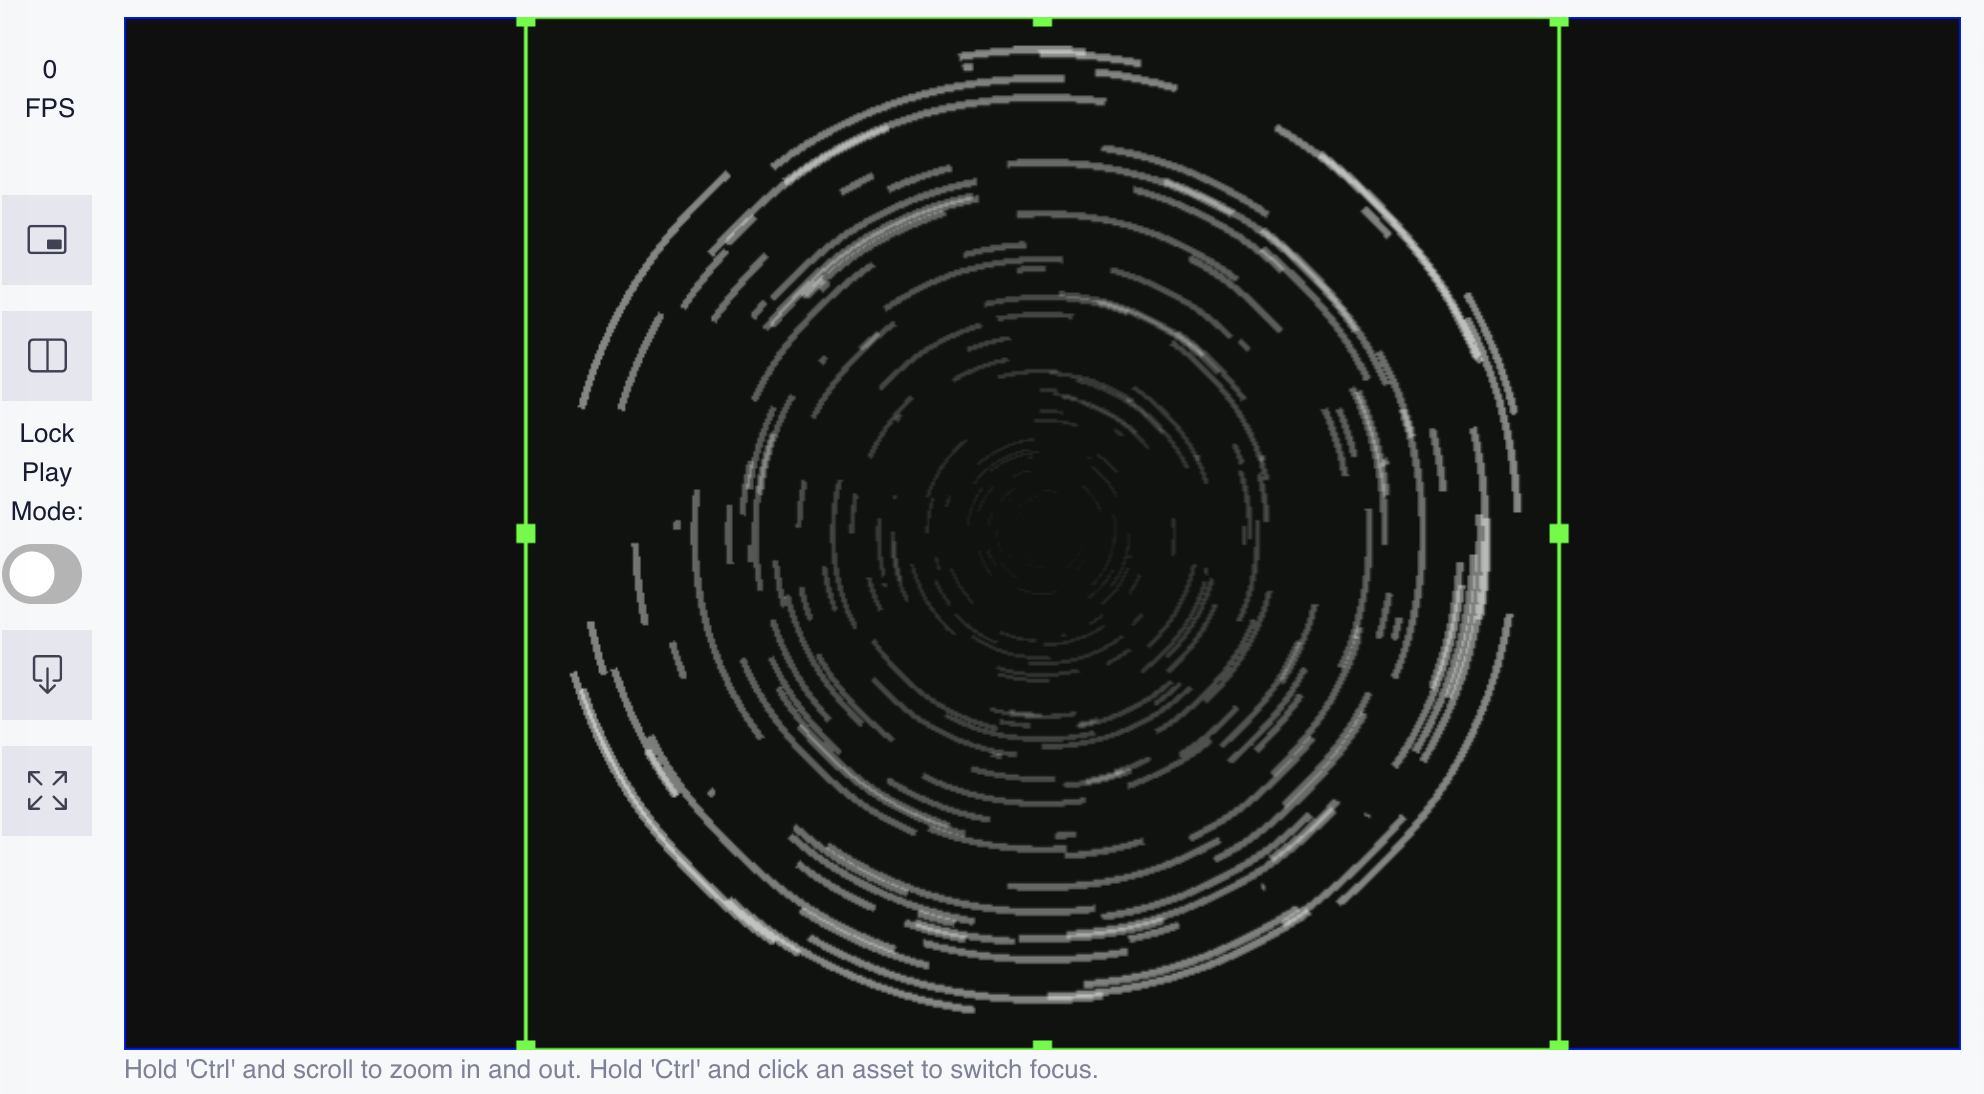
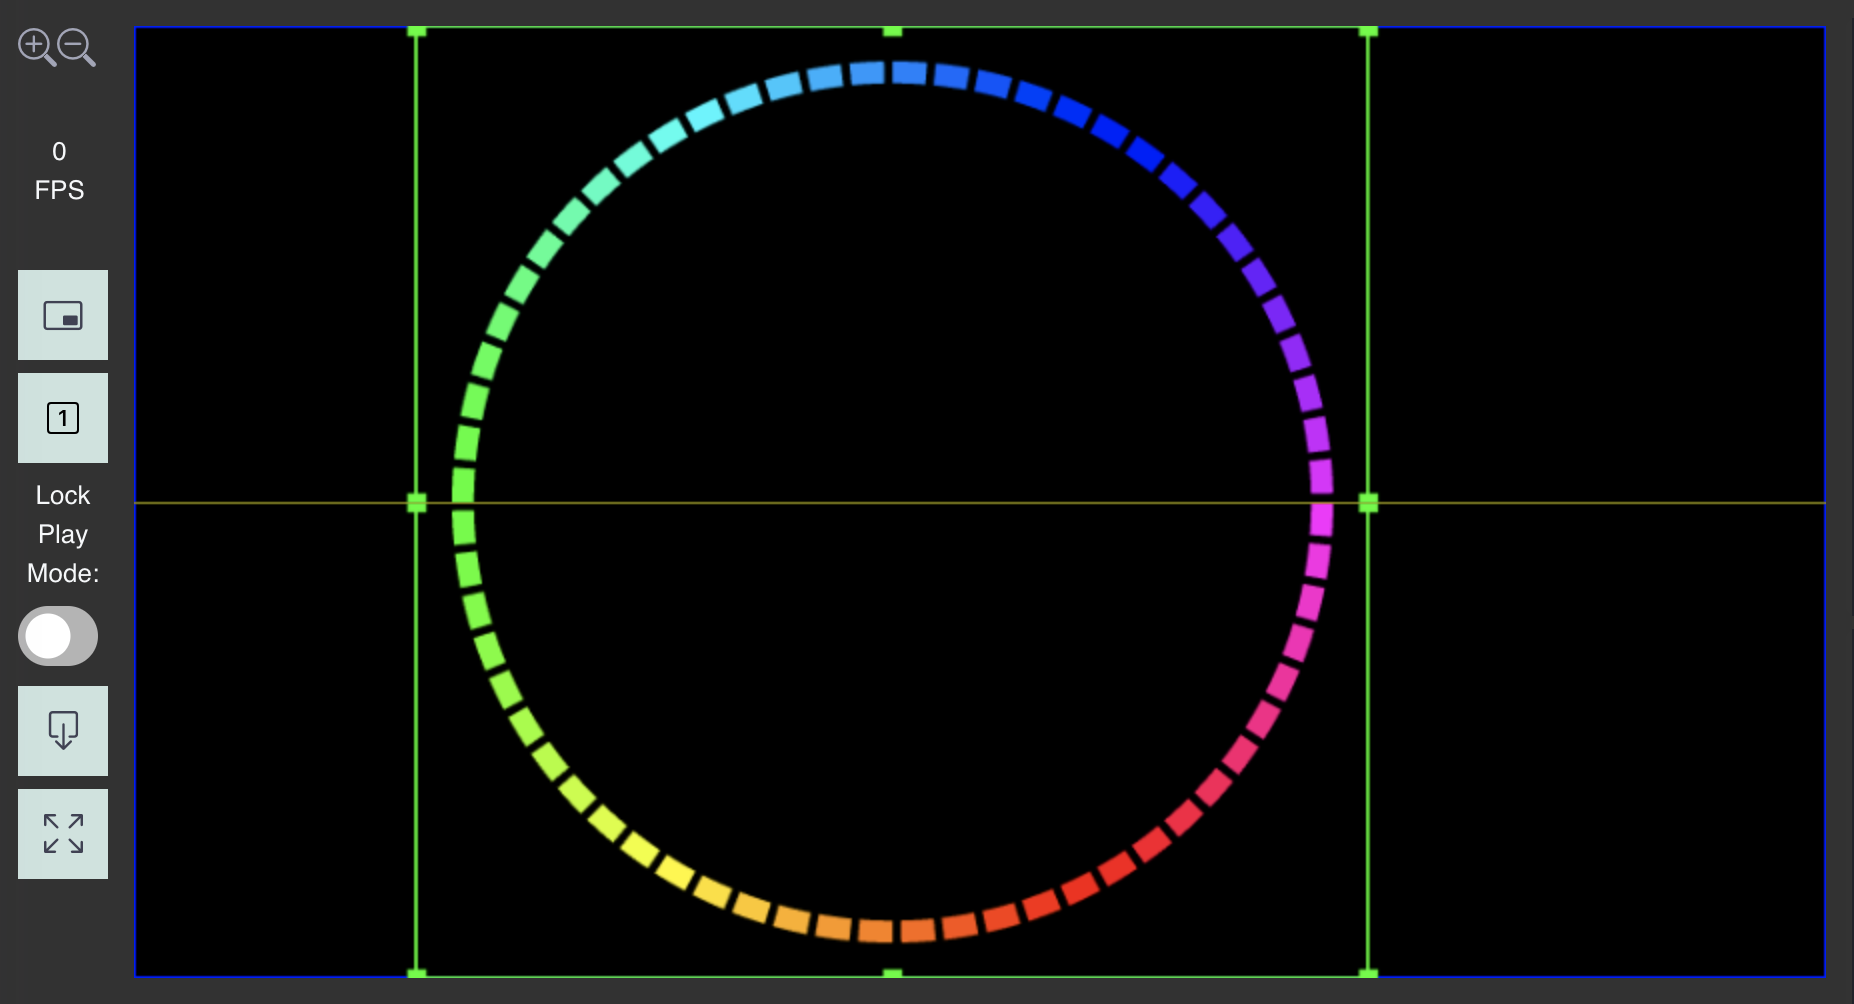
The 'Stage' has two modes: 'interactive' and 'play' mode. In 'interactive' mode, the position of assets is arranged and adjusted directly on the stage. If an asset is selected on the Timeline, it can be adjusted on the stage using the green handles that appear in this mode, clicking and dragging the asset moves it, while adjusting the anchors directly resizes it. Dragging a corner anchor resizes the asset's width and height proportionally, while dragging one of the other anchors resizes width and height independently.
When the project is running in 'play' mode, the 'Stage' shows only the project 'Canvas', displaying video and graphics playing in real time. If a new project is created with different dimensions, the 'Canvas' will appear as a different shape too, reflecting the proportions of that project.
In 'interactive' mode, holding the Ctrl key and left-clicking allows you to select a different asset in the view. Assets can also be nudged by position using the keyboard. Hold Shift and press the arrow keys to move the selected asset incrementally, useful for fine, precise positioning beyond what dragging with the mouse allows.
Preview Controls


The 'Preview Controls' are used to change the way in which the project is shown during 'play' mode. The 'Frame-rate' view shows the number of frames per second the playback is currently achieving. During a performance, this is the rate you should be watching to confirm the project is playing smoothly.
The 'Fullscreen' button expands the stage to occupy the full screen of your computer, useful when displaying through a projector. The 'Dual-screen' button opens the stage in a separate window, which can then be dragged onto a second display and made fullscreen there. This allows the project to play fullscreen on one screen, such as a projector or a second display, while the interface, including the playhead and other controls, remains visible on your primary screen. For this, your computer must be set to use multiple displays rather than 'mirror' displays, which would only duplicate one screen rather than extending across both.
The 'Fullscreen' button expands the stage to occupy the full screen of your computer, useful when displaying through a projector. The 'Set-display' button lets you set the display to use directly for full-screen mode, giving explicit control over exactly which screen the project appears on. This allows the project to play fullscreen on one screen, such as a projector or a second display, while the interface, including the playhead and other controls, remains visible on your primary screen. For this, your computer must be set to use multiple displays rather than 'mirror' displays, which would only duplicate one screen rather than extending across both.
The 'Lock Play Mode' toggle is a convenience function which, when enabled, keeps the player in 'play' mode at all times, preventing it from dropping into 'interactive' mode. This is useful during a live performance, where accidentally revealing asset handles and other interactive-mode elements on the wrong screen could be a problem. The 'Export Stage' button downloads a PNG snapshot of whatever is currently shown on the stage, useful for creating social media content or documentation. Finally, the 'Refresh View' button resets the interactive stage back to its default zoom and pan, useful after zooming or panning around while working in interactive mode.